Table of Contents
Appunti Kivy
Python Code and KV Language
This is the kivyexample.py file:
#!/usr/bin/env python
from kivy.app import App
#kivy.require("1.8.0")
from kivy.uix.floatlayout import FloatLayout

class MyLayout(FloatLayout):
    pass

class KivyExampleApp(App):
    def build(self):
        return MyLayout()

if __name__ == "__main__":
    KivyExampleApp().run()
In the code above we derived a class named KivyExampleApp from the Kivy's App class. The Kivy code will automatically search for a file called kivyexample.kv, and it will parse it using the KV language. The name of the file is derived by the class name, making it all lowercase and removing the leftmost App part (if it exists). So this is the kivyexample.kv file:
<MyButton@Button>:
    font_size: 40
    color: 0,1,0,1
    size_hint: 0.3, 0.2

<MyLayout>:
    MyButton:
        text: "Pos 0, 0"
        pos_hint: {'x': 0, 'y': 0}
    MyButton:
        text: "Center x-y"
        pos_hint: {'center_x': 0.5, 'center_y': 0.5}
    MyButton:
        text: "Pos right-top"
        pos_hint: {'right': 0.9, 'top': 0.3}
    MyButton:
        text: "Pos 0.5, 1.0"
        pos_hint: {'right': 0.5, 'top': 1.0}
In the Python code, the App constructor will return the MyLayout class, which is derived from the Kivy's FloatLayout class. The original class is an empty widget, but we added several buttons using the KV language.
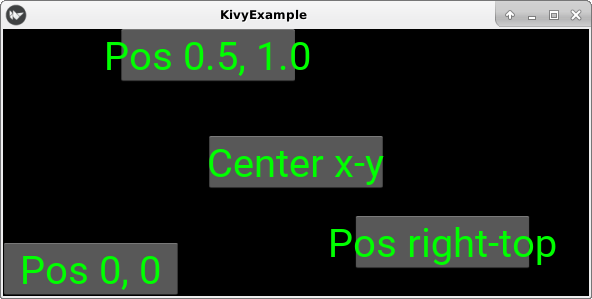
Notice that MyLayout is derived from FloatLayout declaring it into the Python code, whereas the MyButton class is derived from the original Button class using the KV language, via the @Button construct. The result should be something like this:
We used a KV file to define the graphic interface of our App, but it is possible to do that using only Python code, thus having only a single file. But doing as seen above has several advantages. First of all you can try to keep the graphical presentation and the code logic as much separate as possibile. Another advantage is that resizing the app's window, will resize all its contents automatically (if you are smart enough not to use absolute values); otherwise you have to bind the window-resize event to a function which should adjust each widget size and position.
Using the Widget Class
In general our App will return a class derived from the more generic Widget class, not the FloatLayout or others layouts classes. So the KV file will look like this:
<MyWidget>:
    FloatLayout:
        size: root.size
        MyButton:
            text: "Pos 0, 0"
            pos_hint: {'x': 0, 'y': 0}
We requested that the FloatLayout expands to all the parent (root) size, so the example will give the same output as in the previous paragraph.
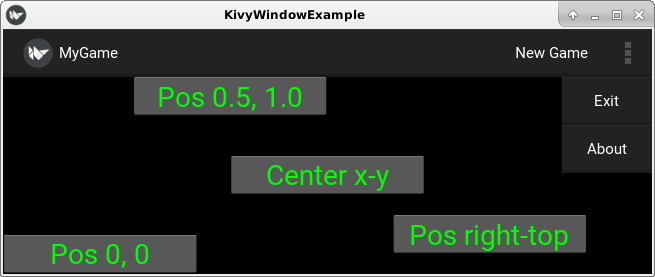
A Real App With an ActionBar
kivywindowexample.py
#!/usr/bin/env python
from kivy.app import App
#kivy.require("1.8.0")
from kivy.uix.widget import Widget

class MyWidget(Widget):
    pass

class KivyWindowExampleApp(App):
    def build(self):
        return MyWidget()

if __name__ == "__main__":
    KivyWindowExampleApp().run()
kivywindowexample.kv
<MyButton@Button>:
    font_size: 28
    color: 0,1,0,1
    size_hint: 0.3, 0.2

<MyWidget>:
    BoxLayout:
        size: root.size
        orientation: 'vertical'
        ActionBar:
            pos_hint: {'top': 1}
            ActionView:
                use_separator: True
                ActionPrevious:
                    title: "MyGame"
                    with_previous: False
                ActionOverflow:
                    ActionButton:
                        text: "Exit"
                    ActionButton:
                        text: "About"
                ActionButton:
                    text: "New Game"
        FloatLayout:
            MyButton:
                text: "Pos 0, 0"
                pos_hint: {'x': 0, 'y': 0}
            MyButton:
                text: "Center x-y"
                pos_hint: {'center_x': 0.5, 'center_y': 0.5}
            MyButton:
                text: "Pos right-top"
                pos_hint: {'right': 0.9, 'top': 0.3}
            MyButton:
                text: "Pos 0.5, 1.0"
                pos_hint: {'right': 0.5, 'top': 1.0}
Logging
Like a plain Python program, it is possible for a Kivy app to produce some logging using the Kivy logger. The output will go, by default, to a file created into the app home directory, into the files/app/.kivy/logs/ directory.
from kivy.logger import Logger, LOG_LEVELS
# Set the loglevel. The Android log file will be create into
# [app_home]/files/app/.kivy/logs/
Logger.setLevel(LOG_LEVELS['debug'])
Logger.info('Informative message')
Without root privileges it is not possibile for another Android app (e.g. a file browser) to access the log directory. The Kivy app home will be into the adopted SD card, under something like this:
/mnt/expand/[UUID]/user/0/[fully.qualified.app.name]
In older Android versions (e.g. Android 8) the app home directory will be something like:
/data/data/[fully.qualified.app.name]
Every time that the Kivy environment is initializated, a new log file will be created; the filename will be something like kivy_YY-MM-DD_N.txt, where YY-MM-DD is the date and N is a progressive integer starting from zero.
The Settings module and Clipboard problem
Importing Settings or SettingsWithNoMenu from the kivy.uix.settings module, you may get the following error when editing a string option:
[INFO   ]  [Clipboard] Provider: gtk3(['clipboard_xclip', 'clipboard_xsel',
                       'clipboard_dbusklipper'] ignored)
[CRITICAL] [Cutbuffer] Unable to find any valuable Cutbuffer provider. Please enable debug
                       logging (e.g. add -d if running from the command line, or change the
                       log level in the config) and re-run your app to identify potential
                       causes
In Linux/X11 environment you have to install the xclip and xsel packages. In Android the error is displayed, but the program continues.
Config and Settings
To build a complete config system including default values, persisten configuration file and a setting screen, you can import the following modules:
from kivy.config import Config
from kivy.uix.settings import Settings, SettingsWithNoMenu
Suppose that the App has two Screen objects, one called MenuScreen which is the main interface and one called SettingsScreen which allows the user to change the settings; several methods of the main App will be called automatically in this order:
- App.build_config(self, config)
- App.build(self)
- MenuScreen.on_pre_enter(self)
- App.build_settings(self, settings)
- App.on_start(self)
The build_config() should explicitly execute config.setdefaults(), which implicitly will execute a config.read() if the configuration file app_name.ini exists. The name of the file is derived from the App instance name, e.g. if the class is named MyApp, the file will be called my.ini.
The build() should generally execute the self.create_settings() which automatically launches build_settings(), which in turn should call explicitly the settings.add_json_panel() function.
In this way, when the on_start() finally executes, the App can get or set config values using the self.config object, automatically instantiated:
self.config.getint('ini_section', 'option'))
Outside the App scope, it is possibile to access the config in this way:
app = App.get_running_app()
app.config.getint('ini_section', 'option')
When the user enters the SettingsScreen and changes some options, this function is called automatically:
- App.on_config_change()
This function should call esplicitly the self.config.write(), which is not handled automatically in every circumstances (e.g. if the app crashes, etc.). The config.write() is called automatically only on graceful app shutdown, only if the app detects a config change, etc. So better to stay safe and call it explicitly on config change.


