Table of Contents
Raspberry Pi Air Quality Station
This is my second approach to the Internet of things, this time I built a weather station to be installed on the balcony. The first one, which was based also on the Raspberry Pi, was a programmable thermostat.
In addition to the classical weather parameters (temperature, pressure and humidity), I added a particulate matter sensor which roughly measures the air pollution.
The station will store acquired data into a SQLite database. The Raspberry Pi does not have a Real-Time Clock: on bootstrap it gets the time via NTP protocol over the internet. If an NTP server is not available, it will default to the time of last shutdown. Neverthless the station is supposed to work and store data even when there is not internet connection, so it is required a Real-Time Clock module. This is the list of used components:
- Raspberry Pi model B rev.2
- BME280 Barometric, Humidity and Temperature Sensor
- PMS5003 Particulate Matter Sensor
- DS3231 Real-Time Clock
- Edimax nano USB WiFi adapter
On the software side we decided to provide data through a simple web interface. It is mandatory to make it compatible with mobile devices (the so-called Responsive web design), so we used the Bootstrap framework. The main features are:
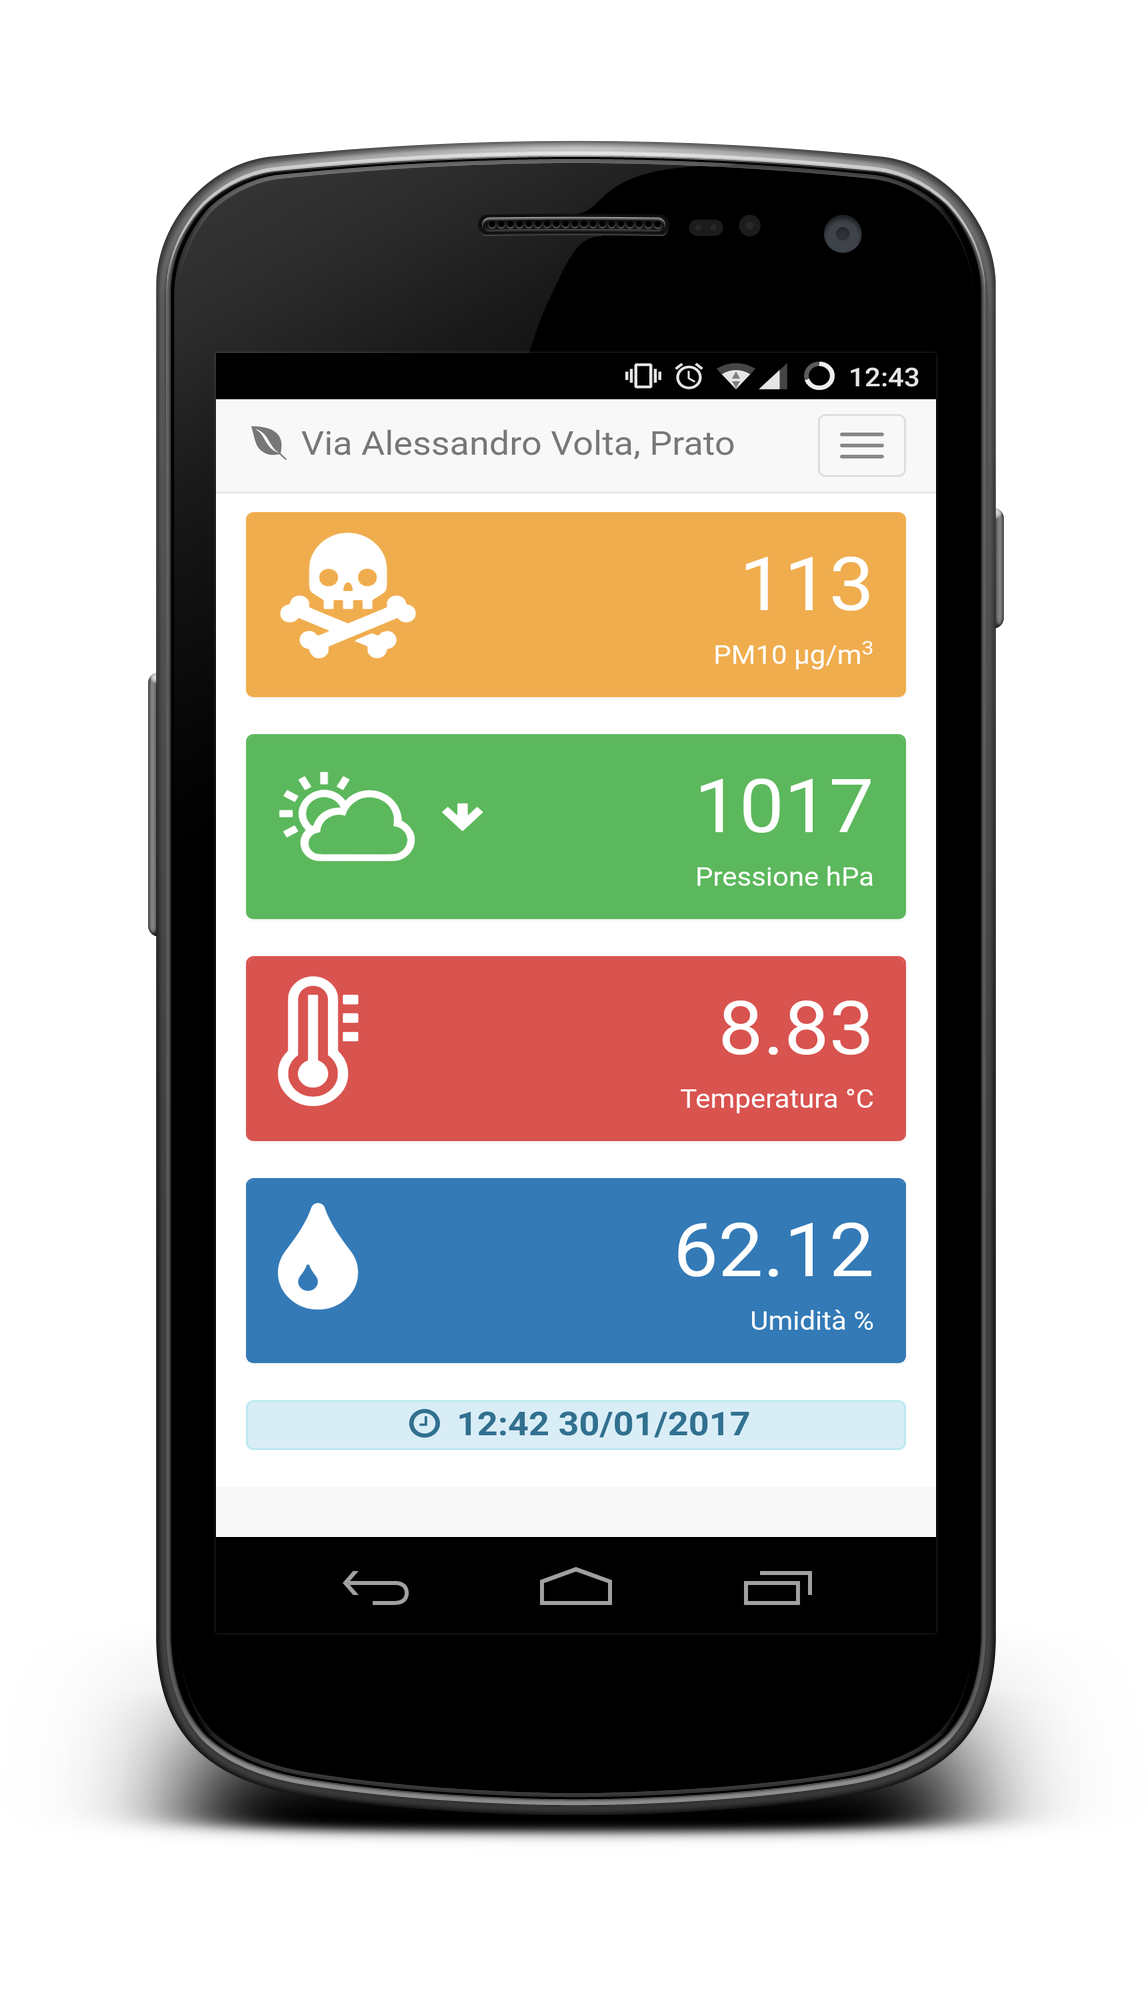
- A simple panel with the summary of current values.
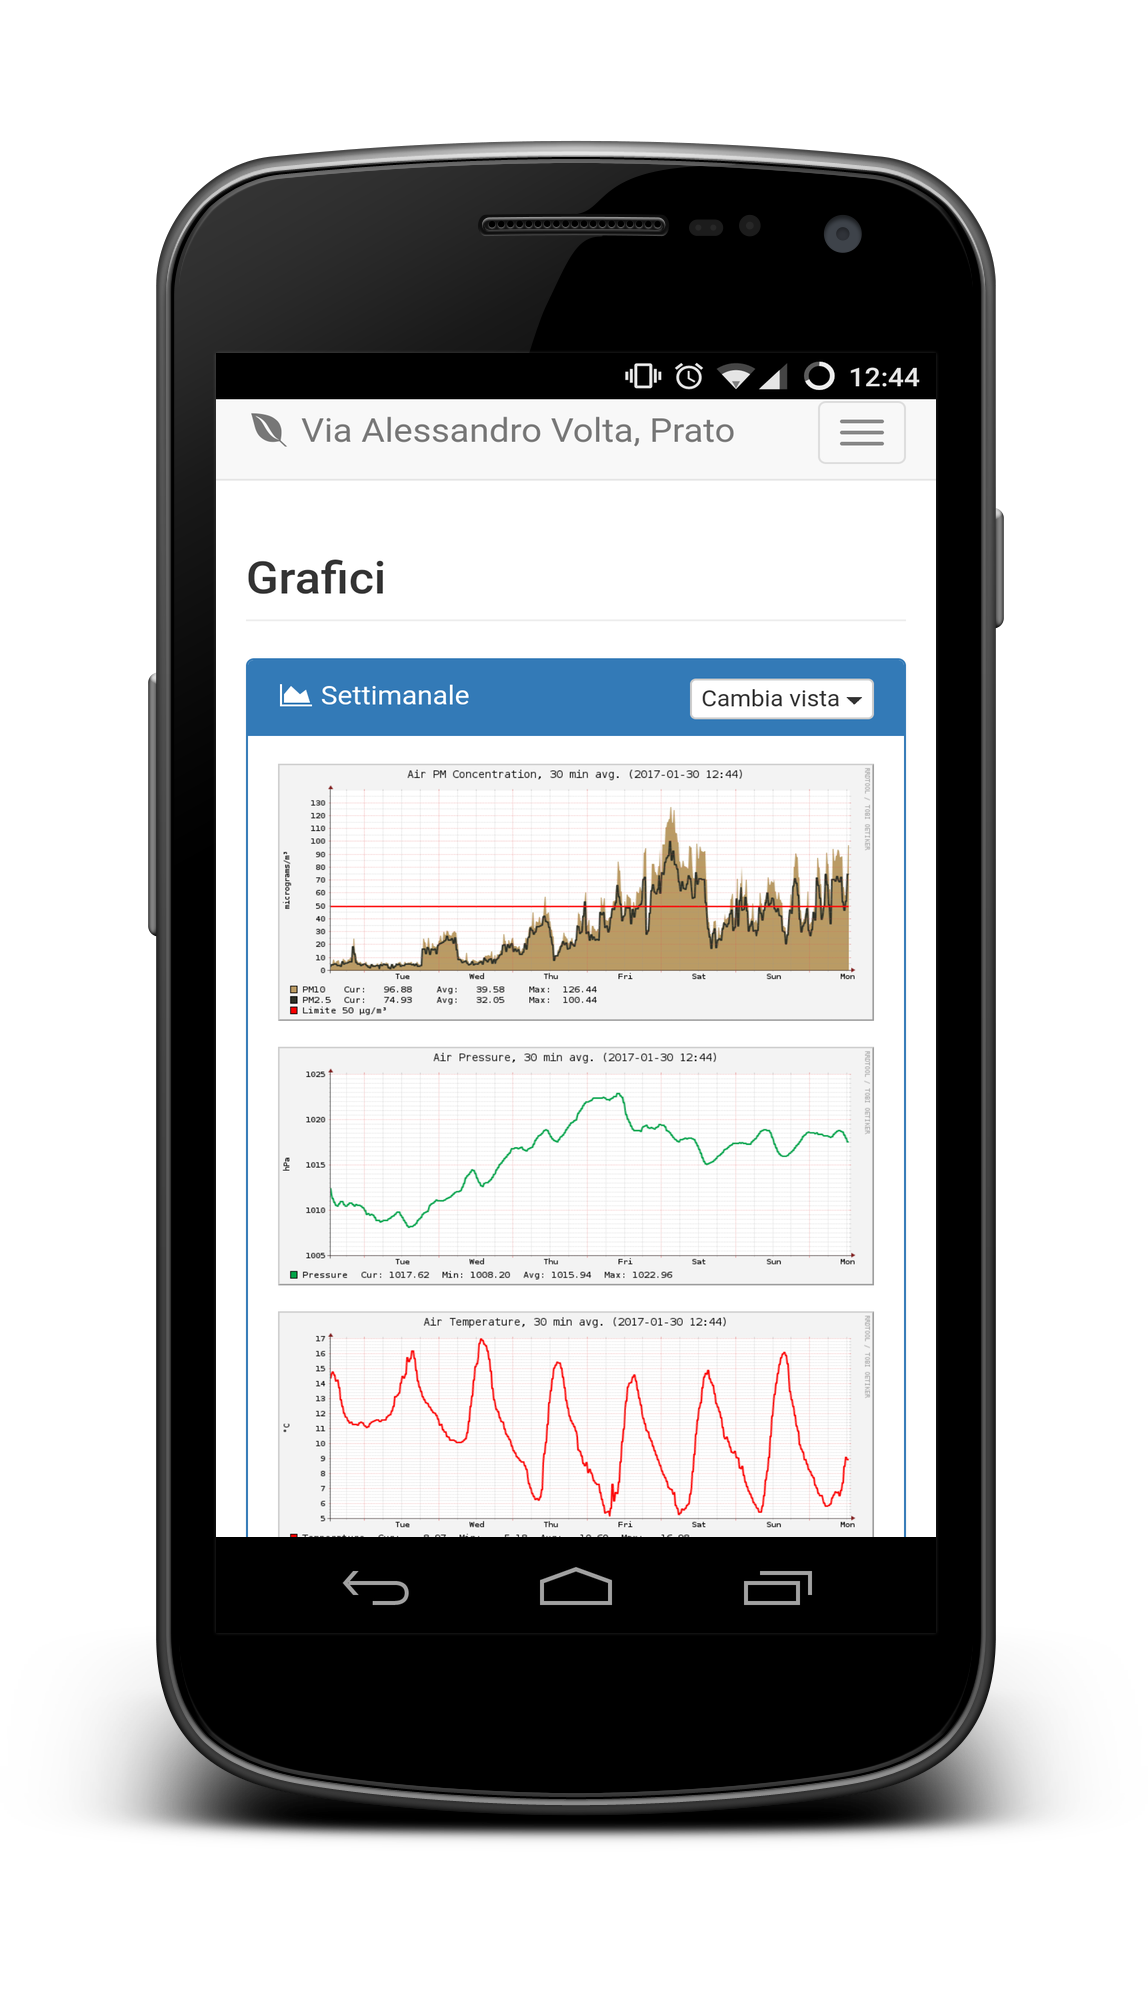
- The graphs of temperature, pressure, humidity and PM10. Daily, weekly, monthly and yearly graphs are available.
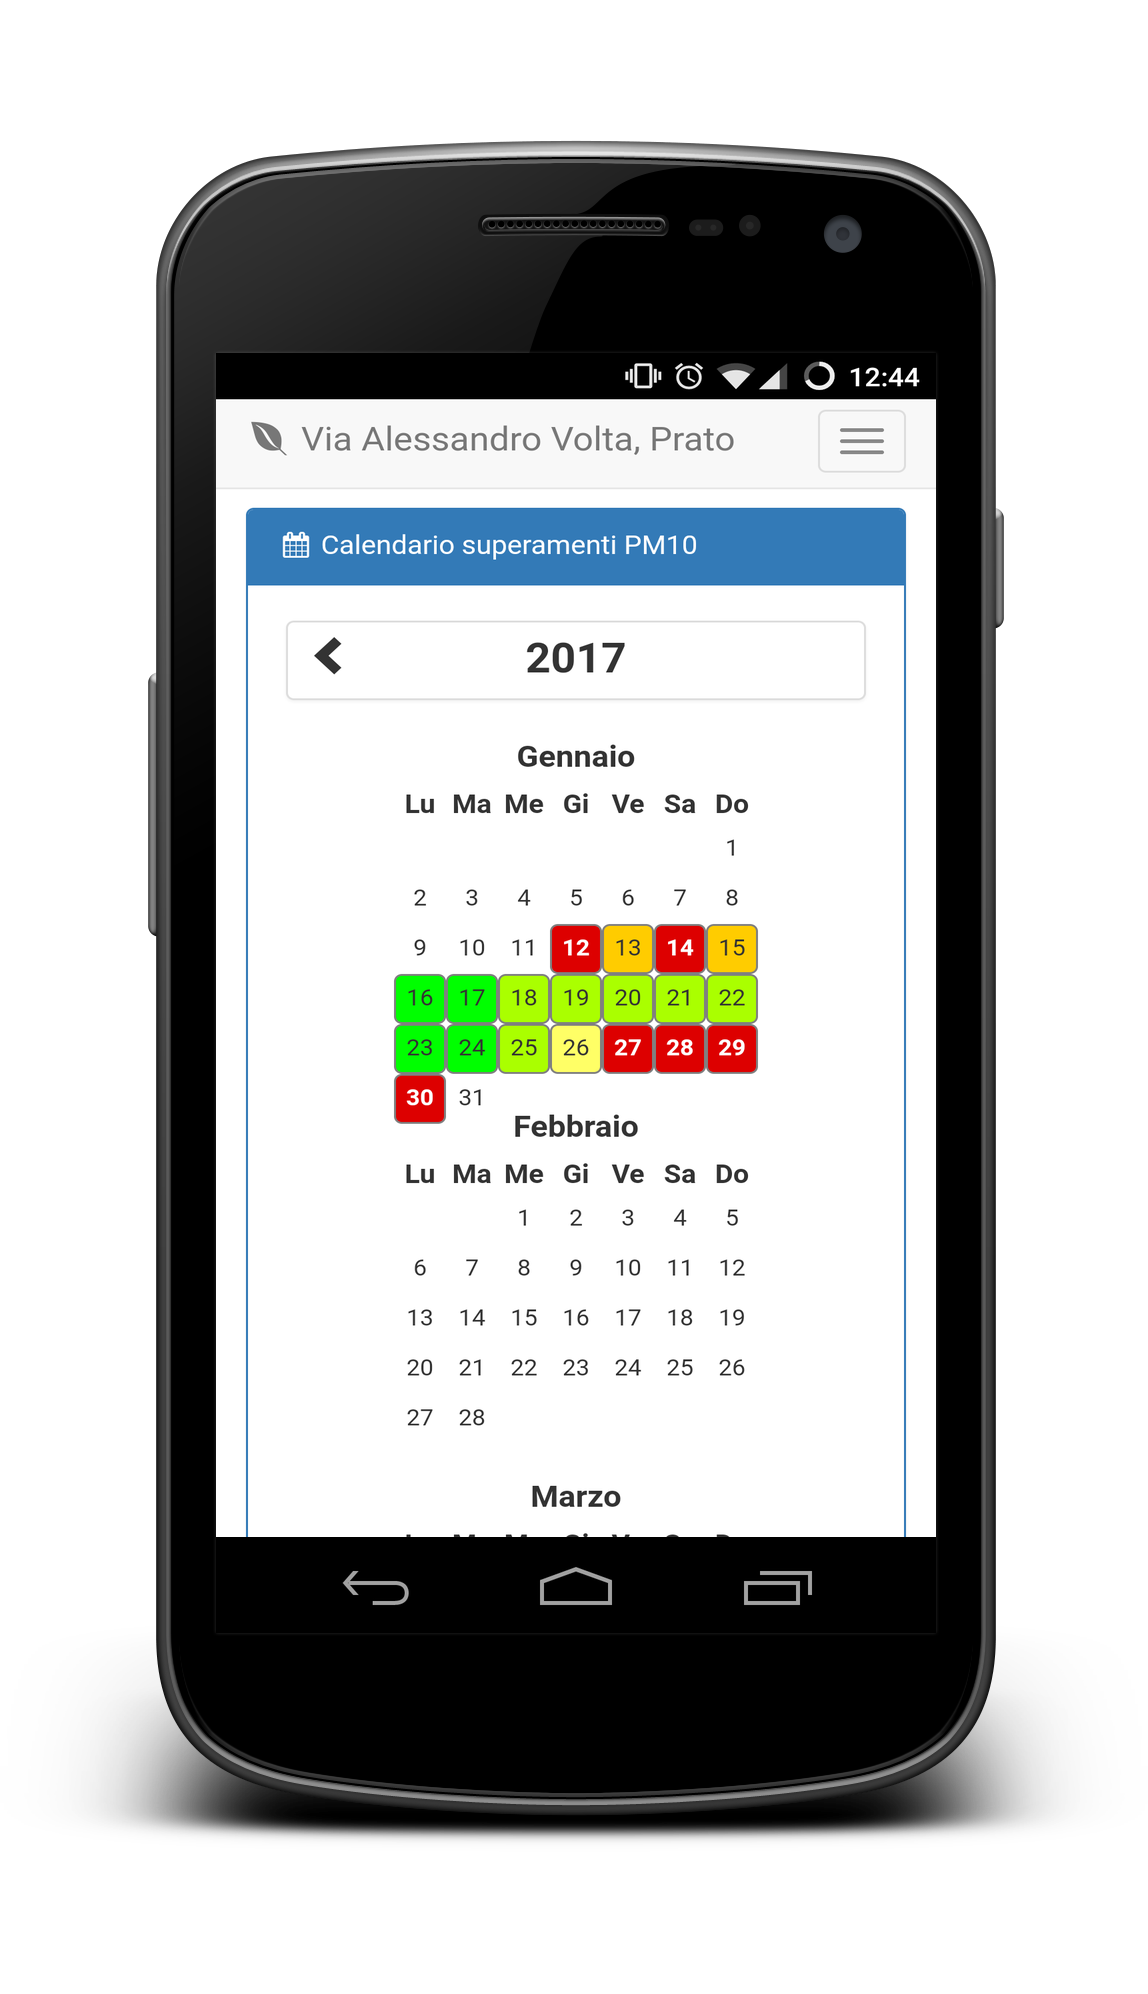
- A calendar with the overview of PM10 pollution. Each day is colored in a scale from green to red. A red day means that average PM10 was above 50 μg/m3.
- An export function to extract data in CSV format.
Components and Connections
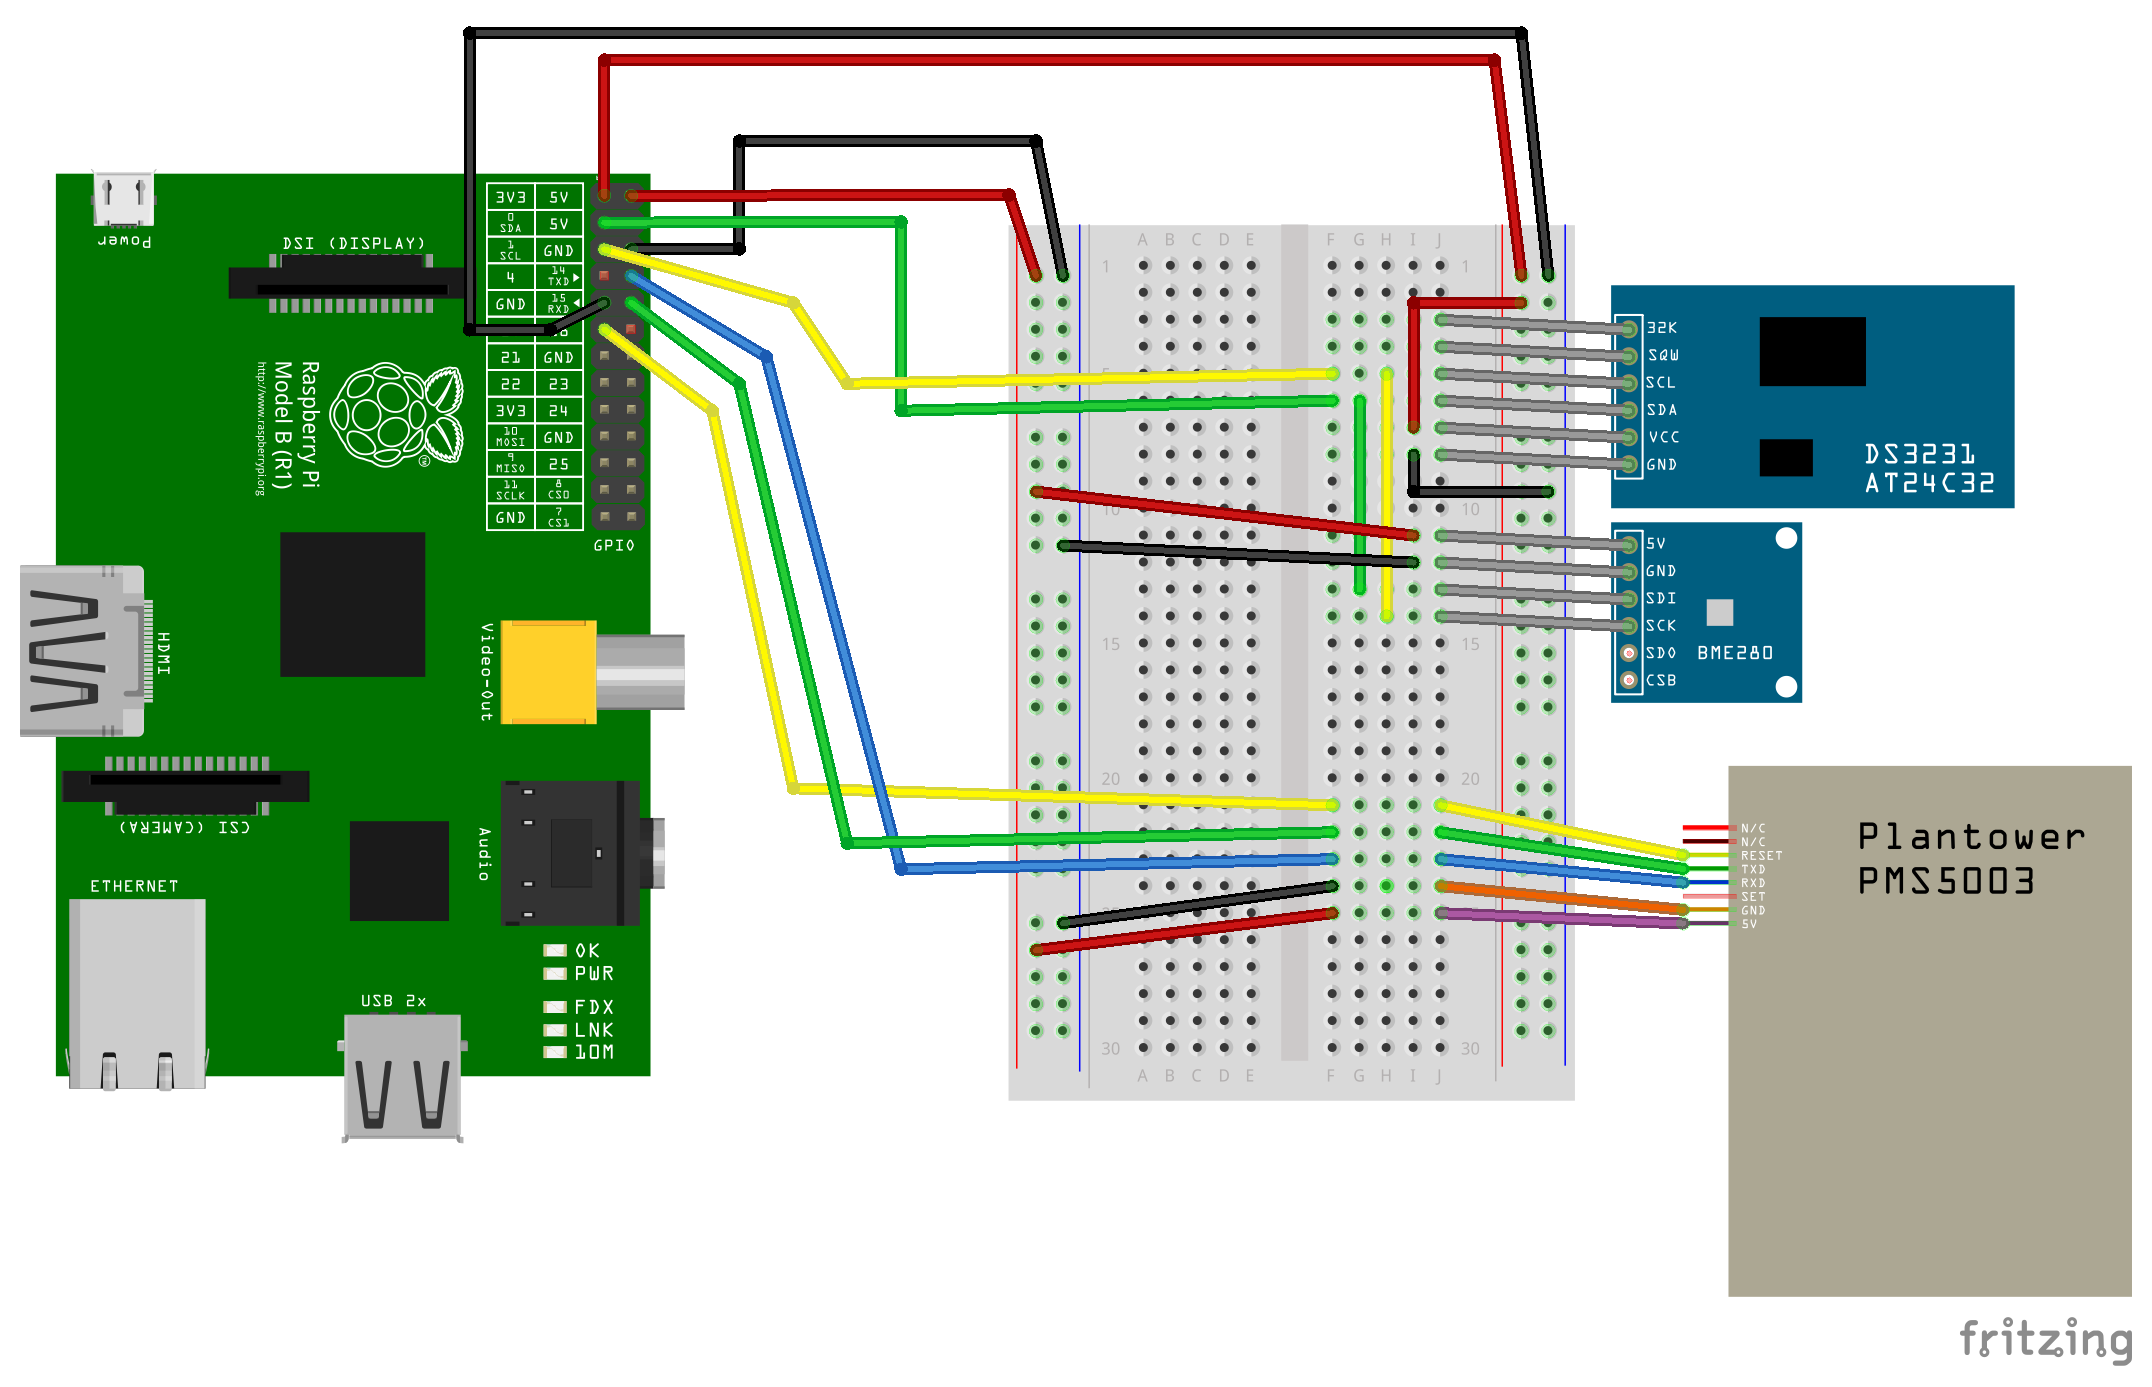
- PMS5003 The Particulate Matter Sensor is connected via the serial line (pin TXD and RXD of the Raspberry Pi), it is powered by 5 VCC and GND. We did not actually connected the RESET line of the sensor to the Raspberry Pi, because it seems that the sensor is quite reliable and we never had to reset it. Neverthless you may connect it to the GPIO #17 and thus to control the reset line if required.
- BME280 The Barometric, Humidity and Temperature Sensor is connected to the I2C bus (pin SDA and SCL of the Rasperry Pi), it is powered by 5 VCC and GND.
- DS3231 The Real-Time Clock is connected to the I2C bus (pin SDA and SCL of the Rasperry Pi), it is powered by 3.3 VCC and GND.
Software setup
Basic Raspbian Setup
The base system is a Raspbian GNU/Linux 9, based on Debian Stretch. Some system configurations are accomplished using the raspi-config tool, we run at least:
- Interfacing Options
- Enable SSH to get remote login via SSH.
- Enable I2C, on this bus we have the BME280 sensor and the DS3231 clock.
- Serial
- Disable Serial Login Shell, our software will use the serial line instead.
- Enable Serial Port, we have the PMS5003 sensor attached to it.
- Localisation Options
- Change Locale, choose the locales you nedd (e.g. en_US.UTF-8).
- Change Timezone, set the proper timezone. Data timestamps will be stored in UTC time.
- Change Wi-fi Country, to use the proper frequencies, etc.
- Advanced Options
- Memory Split: 16, we use only the text interface of the GPU.
- Expand Filesystem (no longer required: Raspbian Stretch does it automatically at first boot).
Be sure to have all the latest updates:
apt-get update && apt-get upgrade
The scripts to run the AirPi station require several Debian packages; install them all:
apt-get install build-essential busybox-syslogd git i2c-tools \
    nginx php7.0-fpm php7.0-sqlite3 \
    python-dev python-requests python-smbus python-serial python-tz \
    rrdtool snmp snmp-mibs-downloader snmpd sqlite3
Because we installed busybox-syslogd to get system log facilities, we can remove rsyslog:
dpkg --purge rsyslog
There are some packeges not strictly required by the AirPi station, but that I find very useful:
apt-get install dselect dump mc minicom nmap screen setserial sniffit tcpdump vim
Edit /etc/nginx/sites-available/default to enable PHP into the Nginx web server, then reload Nginx.
DS3231 RTC Clock
If you instelled the Real-Time Clock module edit /etc/modules and /etc/rc.local as explained in Enabling RTC at bootstrap, then you should remove the fake-hwclock package:
vi /etc/modules
vi /etc/rc.local
dpkg --purge fake-hwclock
Python Libraries
The Adafruit library for the GPIO lines is required by the Adafruit BME280 library to access I2C bus. It is advisable to install also some packages from the Raspbian distro, otherwise the python setup will try to download and install a local version:
apt-get install python-dev python-setuptools python-spidev
The Adafruit Python library is installed from the Git repository:
cd /usr/local/src/
git clone https://github.com/adafruit/Adafruit_Python_GPIO.git
cd Adafruit_Python_GPIO
python setup.py install
The setup procedure will download and install also the Adafruit_PureIO library. Everything will be installed into the /usr/local/lib/python2.7/dist-packages/ directory.
Serial Line
Setting the serial line via raspi-config as exposed above should suffice, for more info see More on Serial Line (Manual Setup). The kernel will expose the serial line at bootstrap using the device /dev/ttyAMA0 (Raspberry Pi 2) or /dev/serial0 (Raspberry Pi 3). Read the kernel messages using the dmesg command.
AirPi software
This software collection will bring you:
- The scripts to read sensors data (BME280 and PMS5003).
- The cronjobs to gather data periodically.
- The web interface to display sensors data.
- The configuration web interface.
Everything is stored into the GitHub AirPi repository, there is a Makefile included, which should do the installation.
cd /usr/local/src
git clone https://github.com/RigacciOrg/AirPi
cd AirPi
make install-lib
make install-config
make install-html
make install-webconfig
Edit the /etc/airpi/airpi.cfg configuration file and make sure you have the rights bme280 I2C_ADDRESS and pms5003 DEVICE. Now you should be able to read the sensors, using these commands:
vi /etc/airpi/airpi.cfg
/usr/local/lib/airpi/bme280-snmp
/usr/local/lib/airpi/pms5003

Hardware Setup and Test
DS3231 RTC Clock
We purchased an DS3231 AT24C32 I2C priced 3 € on eBay. There are many variants of this breakout board, the one use by us is labeled ZS-042.
Rechargeable or non-rechargeable battery?
The RTC module is sold without any documentation, but there are several articles on the internet about this module, which seems to exists in many variants, the one used by us is labeled ZS-042. The main question is what battery to use? A rechargeable (LIR2032) or non-rechargeable (CR2032) one? We want to use a standard CR2032 non-rechargeable cell, because its cost and availability.
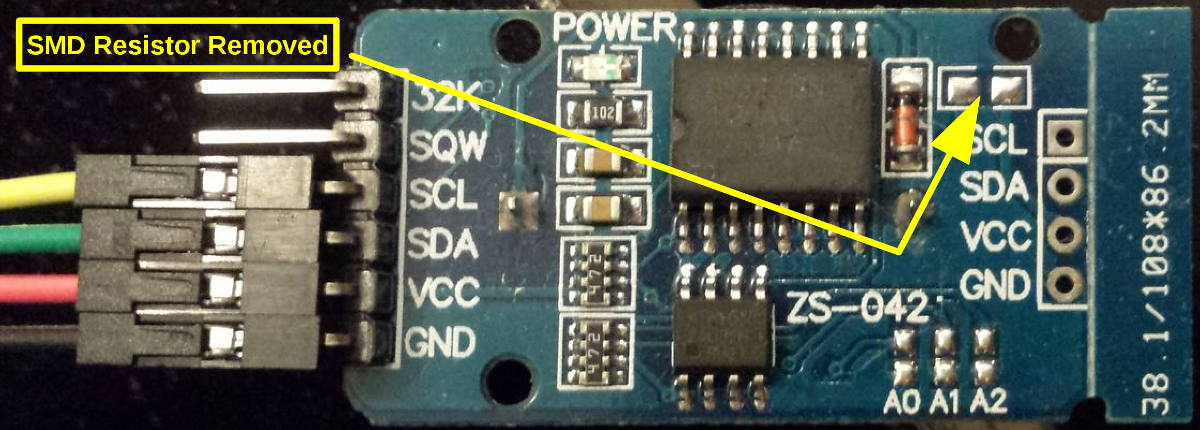 As reported by some nice reviews, the module has a recharging circuit, and providing some voltage to a non-rechargeable battery is bad! With a multimeter we checked that effectively there is a charging current while the module is powered on, so we taken steps to “disable” the circuit before putting the module at work with the battery installed.
Following the suggestion of this post and this other one, we just removed a surface mounted resistor from the module (see picture above): the charging current disappeared and the clock module keeps time using the battery when it is powered down.
Required software
On the Raspberry Pi we need some extra packages containing some tools for the I2C bus:
apt-get install python-smbus i2c-tools
Once the kernel modules are loaded, we can detect I2C devices on the bus (suppose that the bus is #1):
modprobe i2c-dev
i2cdetect -y 1
Manual test
Then we can test if the RTC is working:
# Load the kernel modules.
modprobe i2c-dev
modprobe rtc-ds1307
# Instantiate a DS1307/DS3231 device (RTC) at address 0x68 into the I2C bus
echo ds1307 0x68 > /sys/class/i2c-adapter/i2c-1/new_device
# Read the hardware clock (RTC).
hwclock --show
# Set the Hardware Clock to the current System Time.
hwclock --systohc
# Set the system clock from RTC.
hwclock --hctosys
Enabling RTC at bootstrap
This will work on Raspbian based on Debian Jessie 8. Use raspi-config, Advanced Options ⇒ I2C to enable automatic loading of I2C kernel modules. It will add the following line in /boot/config.txt
dtparam=i2c_arm=on
and the following one in /etc/modules:
i2c-dev
In the same /etc/modules add also :
i2c-dev
rtc-ds1307
To instantiate the DS1307/DS3231 device (RTC) at address 0x68 of the I2C bus, we need to execute a comand, choose the proper method upon your startup process (sysvinit, systemd, etc.). There is a method, somewhat deprecated, but which should works with every startup system: add the commands into /etc/rc.local:
# ==== Real Time Clock ====
# Wait for kernel modules to settle (sleep 1 => FAIL, sleep 2 => OK).
# Instantiate a DS1307 Realtime Clock at address 0x68 of the I2C bus.
sleep 3; echo ds1307 0x68 > /sys/class/i2c-adapter/i2c-1/new_device
# Wait for the device to bring to life, then set system clock from RTC.
sleep 1; hwclock --hctosys
WARNING: Beware of the sleep command above! It seems that kernel modules require some time to settle and to expose the RTC device properly! If you try to instantiate the device too early you will corrupt the clock registers. In that case you will receive this error when reading the clock:
hwclock --show
hwclock: The Hardware Clock registers contain values that are either invalid (e.g. 50th day of month)
or beyond the range we can handle (e.g. Year 2095).
Remove the package fake-hwclock which store the current time at shutdown and restore it at bootstrap:
dpkg --purge fake-hwclock
BME280 Barometric Sensor
We purchased an BME280 breakout made by Drotek on eBay for about 13 €. The sensor can be connected via the SPI or the I2C interface, we prefer the I2C one. The provided documentation is not so clear; there are breakouts with this chip which have an internal voltage regulator, so they can accept 3.3 V or 5.0 V. This one seems to accept only the 5.0 volt, we provided that voltage on the power pin.
Once connected and powered-up, the i2cdetect tool detects the following chips (the device at address 0x68 marked as “UU” - in use by a driver - is the DS3231 RTC clock):
i2cdetect -y 1
     0  1  2  3  4  5  6  7  8  9  a  b  c  d  e  f
00:          -- -- -- -- -- -- -- -- -- -- -- -- --
10: -- -- -- -- -- -- -- -- -- -- -- -- -- -- -- --
20: -- -- -- -- -- -- -- -- -- -- -- -- -- -- -- --
30: -- -- -- -- -- -- -- -- -- -- -- -- -- -- -- --
40: -- -- -- -- -- -- -- -- -- -- -- -- -- -- -- --
50: -- -- -- -- -- -- -- -- -- -- -- -- -- -- -- --
60: -- -- -- -- -- -- -- -- UU -- -- -- -- -- -- --
70: -- -- -- -- -- -- -- 77
The BME280 is on address 0x77 of the I2C bus; it seems that 0x77 is used by Adafruit and by Drotek for their breakout boards: We found also an unbranded/Chinese maker which uses the 0x76 address.
To read data from the BME280, we used the Adafruit Python BME280 library, which depends upon the Adafruit Python GPIO library. So the full procedure to install them is as follow:
apt-get install git build-essential python-dev python-smbus python-setuptools python-spidev
cd /usr/local/src/
git clone https://github.com/adafruit/Adafruit_Python_GPIO.git
cd Adafruit_Python_GPIO
python setup.py install
cd /usr/local/bin/
wget https://raw.githubusercontent.com/adafruit/Adafruit_Python_BME280/master/Adafruit_BME280.py
Adafruit packages for GPIO access will be installed into /usr/local/lib/python2.7/dist-packages/ directory. Instead we installed the BMP280 driver directly into /usr/local/bin. The example is rather simple:
from Adafruit_BME280 import *

sensor = BME280(mode=BME280_OSAMPLE_8)

degrees = sensor.read_temperature()
pascals = sensor.read_pressure()
hectopascals = pascals / 100
humidity = sensor.read_humidity()

print 'Timestamp = {0:0.3f}'.format(sensor.t_fine)
print 'Temp      = {0:0.3f} deg C'.format(degrees)
print 'Pressure  = {0:0.2f} hPa'.format(hectopascals)
print 'Humidity  = {0:0.2f} %'.format(humidity)
The Adafruit code uses the forced mode explained into the BME280 datasheet, which is the suggested one for low sampling rates (1 Hz and below) and to get synchronized readout. We used the oversampling mode BME280_OSAMPLE_16 (to reduce readout noise), which is far above the suggested settings for weather and humidity monitoring.
The Adafruit code has probably a little bug, where a 16384.0 coefficient is written as 16384.8 (I opened an issue on that).
We tried also a Python code from Matt Hawkins which was nice because has no fancy dependencies. Unfortunately it does not provide correct data for the humidity value: strange enough the graph shape was exactly the same of the temperature. May be the bug is that it does not wait enough time after starting acquisition in forced mode (see acquisition times at p. 51 of the datasheet).
Particulate Concentration Sensor PMS5003
The Plantower PMS5003 is a Particulate Matter sensor based on Laser Light Scattering Technique. Here it is the English version of the manual.
Technical specifications
Table 1 - Sensor specifications
| Parameter | Index | Unit |
|---|---|---|
| Particulate measurement range | 0.3~1.0; 1.0~2.5; 2.5~10 | µm (micron) |
| Particle counting efficiency | 50% @ 0.3 µm; 98% @ >= 0.5 µm | |
| Volume measurement accuracy | 0.1 | L (liters) |
| Response time | <=10 | s (seconds) |
| DC supply voltage | 5.0 | V (volt) |
| Working current | <=100 | mA |
| Standby current | <=200 | µA |
| Data interface level | LOW <0.8@3.3; HIGH >2.7@3.3 | V (volt) |
| Operating temperature range | -20~+50 | C° |
| Operating Humidity range | 0~99 | % |
| Mean time between failures | >=3 | years |
| Size | 50 × 38 × 21 | mm |
Table 2: Interface diagram
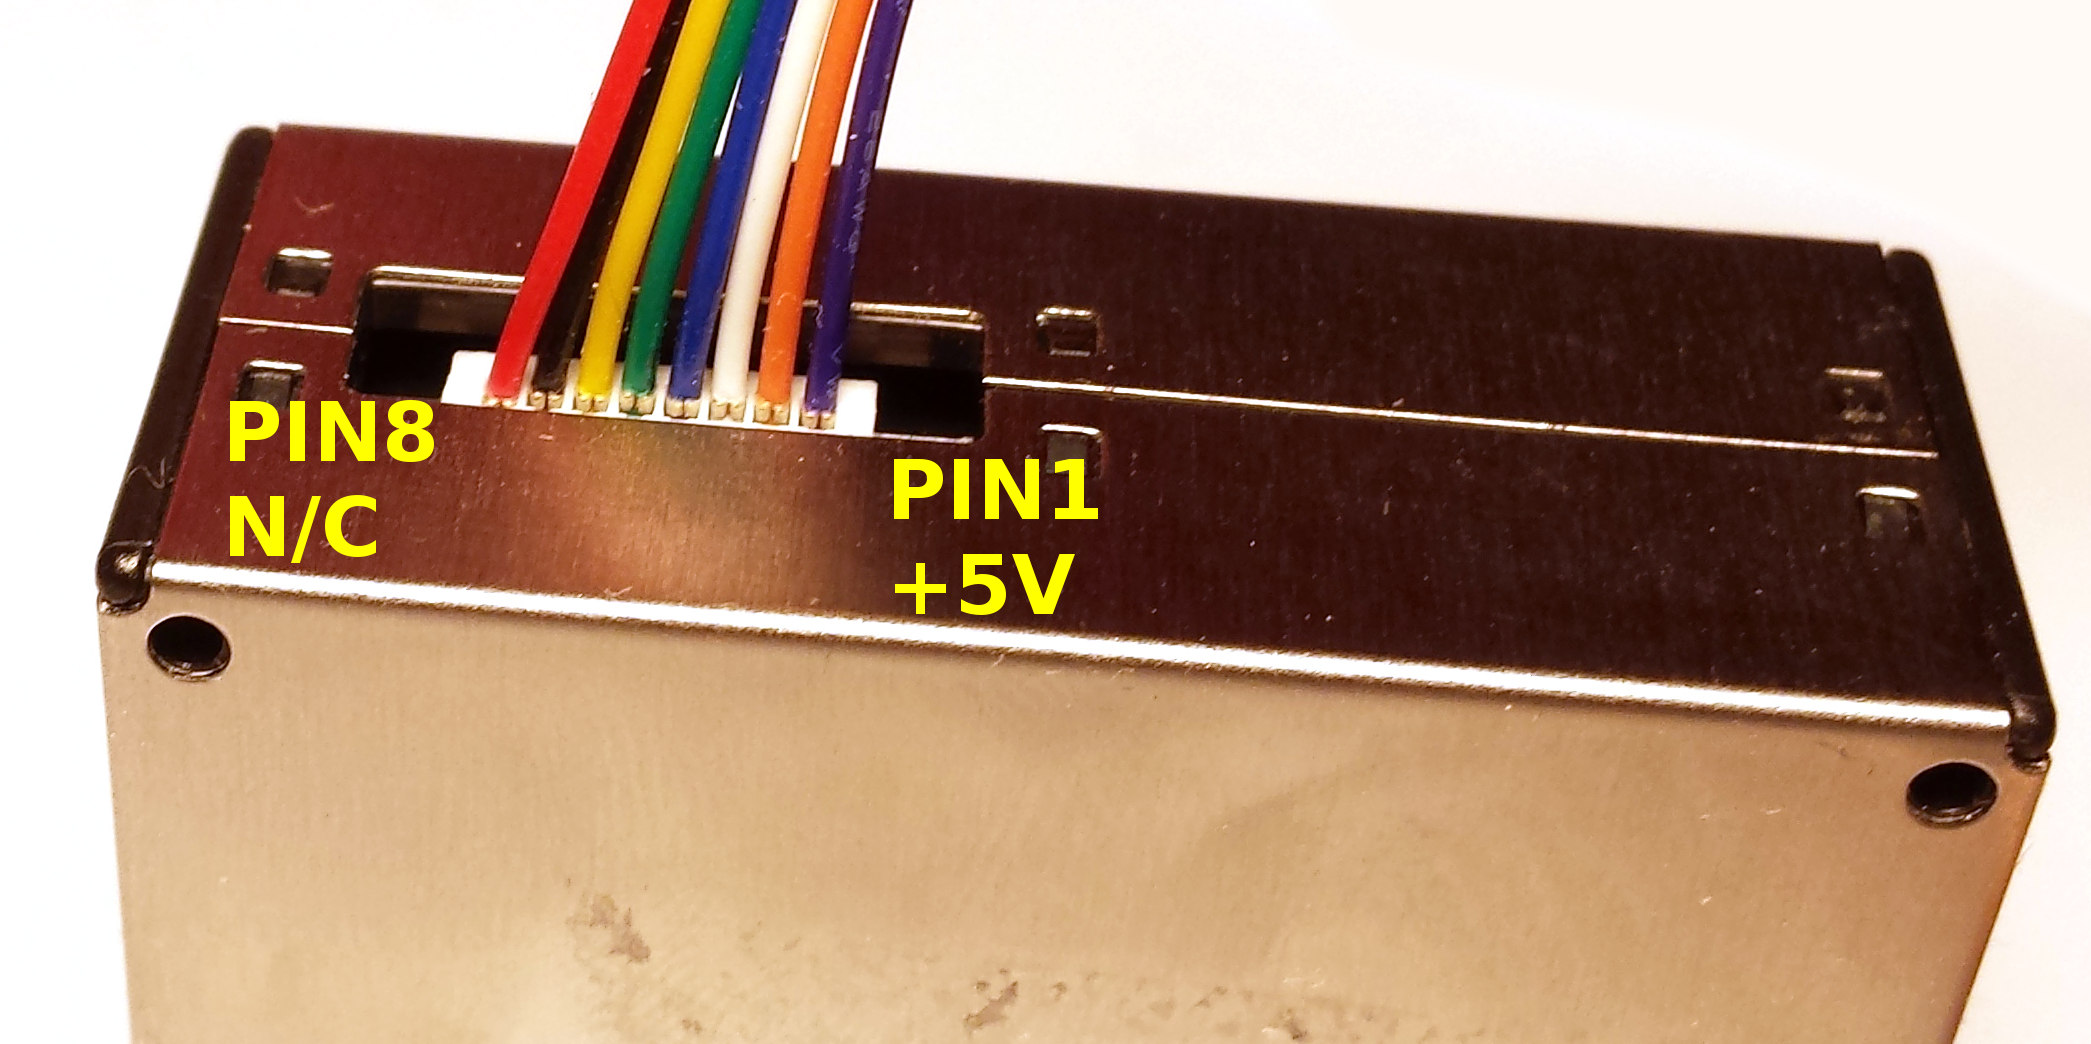
Beware of colors of wires, which do not correspond to widely used conventions! The wire for VCC +5V is purple, the wire for ground is orange, at least in our sample.
| PIN number | Function | Description |
|---|---|---|
| 1 | VCC | Power positive (+5V) |
| 2 | GND | Power negative |
| 3 | SET | TTL level @3.3V: HIGH or floating for normal working state, LOW for sleep state |
| 4 | RXD | Serial Receive TTL level @3.3V |
| 5 | TXD | Serial Transmit TTL level @3.3V |
| 6 | RESET | Module Reset TTL level @3.3V: LOW for Reset |
| 7 | N/C | |
| 8 | N/C |
Table 3: Model definition
| PMS | 50 | 03 |
|---|---|---|
| Sensor type: Particulate Matter concentration Sensor | Model version | Minimum particle size resolution: 03: 0.3 µm 05: 0.5 µm 10: 1.0 µm 25: 2.5 µm I: With I2C Interface T: With temperature and humidity sensors |
Output results
- The main output for the volume of particles per unit volume and the number of particles, including the number of particles of the unit volume of 0.1 liters, mass concentration units: μg/m³.
- There are two output protocols: active and passive; the default state after power-on is active output, where the sensor sends serial data to the host at intervals of 200 ~ 800ms. At higher concentrations of particulate matter, the time interval is shorter. Active output has two modes: smooth and fast. When the concentration of airborne particles is small, the sensor uses smooth mode (every three times), the actual data update period is about 2 seconds. When the concentration of air particles becomes greater, the sensor output automatically switches to the fast mode, each output is a new value, the actual data update period is 200 ~ 800ms.
- Temperature and humidity output: output sampling sensor inside the air temperature and humidity.
Typical circuit connections
Connection between PMS1003/3003/5003 and the Microprocessor Control Unit host.
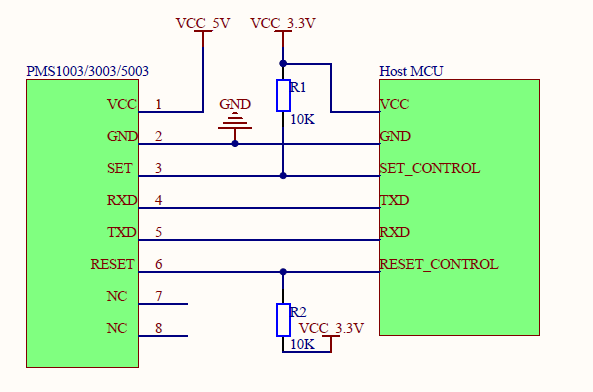
Figure 3 Schematic diagram of a typical circuit connections
- The PMS5003T requires a power voltage of 5V, because the fan requires 5V. The data communications and controls are instead at 3.3V. The HIGH level is expected to be at 3.3V, so the MCU host should provide 3.3V on the PINs. If the MCU communicates at 5V, the communication lines (RXD, TXD) and control lines (SET, RESET)should be connected through a level-shifting circuit.
- The SET and RESET PINs should be connected to an internal pull-up resistor. If not used they should be left not connected.
- PIN7 and PIN8 are for internal debugging, they should be left not connected.
- When the sleep function is activated, the fan stops working. When the sensor is awakened, it requires at least 30 seconds to settle. In order to obtain accurate data, wake-up the sensor from the sleeping state at least for 30 seconds.
Appendix 1: Active Transfer Protocol
WARNING! The sensor counts the particles in the air, but it is unable to differentiate their size and weight; it just see the particles if they are greater than 0.3 μm in size; keep in mind also that the counting efficiency varies for different particle sizes. To calculate the concentration in μg/m³ and the particle count for different classes of size, some formulas are applied, assuming a generic distribution of particles in the atmosphere. If you want to measure the generic atmosphere pollution, you should consider the values provided by Data4, Data5 and Data6. Instead Data1, Data2 and Data3 measure the concentration in laboratory conditions, assuming that particles of just one size are present.
- Default baud rate: 9600 bps; Parity: None; Stop bits: 1 bit
- Total protocol length: 32 bytes
| Offset | Definition | Data |
|---|---|---|
| 0 | Start byte 1 | Fixed 0x42 (char “B”) |
| 1 | Start byte 2 | Fixed 0x4d (char “M”) |
| 2 | Frame length (16 bit) | Length = 13 * 2 + 2 (data + checksum) |
| 4 | Data 1 (16 bit) | The PM1.0 concentration (CF = 1, standard particle), unit μg/m³ |
| 6 | Data 2 (16 bit) | The PM2.5 concentration (CF = 1, standard particle), unit μg/m³ |
| 8 | Data 3 (16 bit) | The PM10 concentration (CF = 1, standard particle), unit μg/m³ |
| 10 | Data 4 (16 bit) | The PM1.0 concentration (generic atmospheric conditions), unit μg/m³ |
| 12 | Data 5 (16 bit) | The PM2.5 concentration (generic atmospheric conditions), unit μg/m³ |
| 14 | Data 6 (16 bit) | The PM10 concentration (generic atmospheric conditions), unit μg/m³ |
| 16 | Data 7 (16 bit) | The number of particles with diameter => 0.3 μm in 0.1 liter of air |
| 18 | Data 8 (16 bit) | The number of particles with diameter => 0.5 μm in 0.1 liter of air |
| 20 | Data 9 (16 bit) | The number of particles with diameter => 1.0 μm in 0.1 liter of air |
| 22 | Data 10 (16 bit) | The number of particles with diameter => 2.5 μm in 0.1 liter of air |
| 24 | Data 11 (16 bit) | The number of particles with diameter => 5.0 μm in 0.1 liter of air |
| 26 | Data 12 (16 bit) | The number of particles with diameter => 10.0 μm in 0.1 liter of air |
| 28 | Data 13 (higher 8 bit) | Reserved (version number?) |
| 29 | Data 13 (lower 8 bit) | Reserved (error code?) |
| 30 | Data checksum (16 bit) | Checksum = byte 0 + byte 1 + … byte 29 |
Appendix 2: Passive Transfer Protocol
- Default baud rate: 9600 bps; Parity: None; Stop bits: 1 bit
Host communication protocol format
| Start byte 1 | Start byte 2 | Instruction byte | Status byte 1 | Status byte 2 | Check byte 1 | Check byte 2 |
|---|---|---|---|---|---|---|
| 0x42 | 0x4d | CMD | DATA-H | DATA-L | LRC-H | LRC-L |
1) Instruction and feature byte definitions
| CMD | DATA-H | DATA-L | Description |
|---|---|---|---|
| 0xe2 | X | X | Passive reading |
| 0xe1 | X | 00H-Passive 01H-Active | State switching |
| 0xe4 | X | 00H-Standby mode 01H-Normal mode | Standby control |
2) Command response
0xe2: 32-byte response, with the A protocol.
3) Verify the word generation
All bytes are summed starting from the character word
A small PCB to easy connection
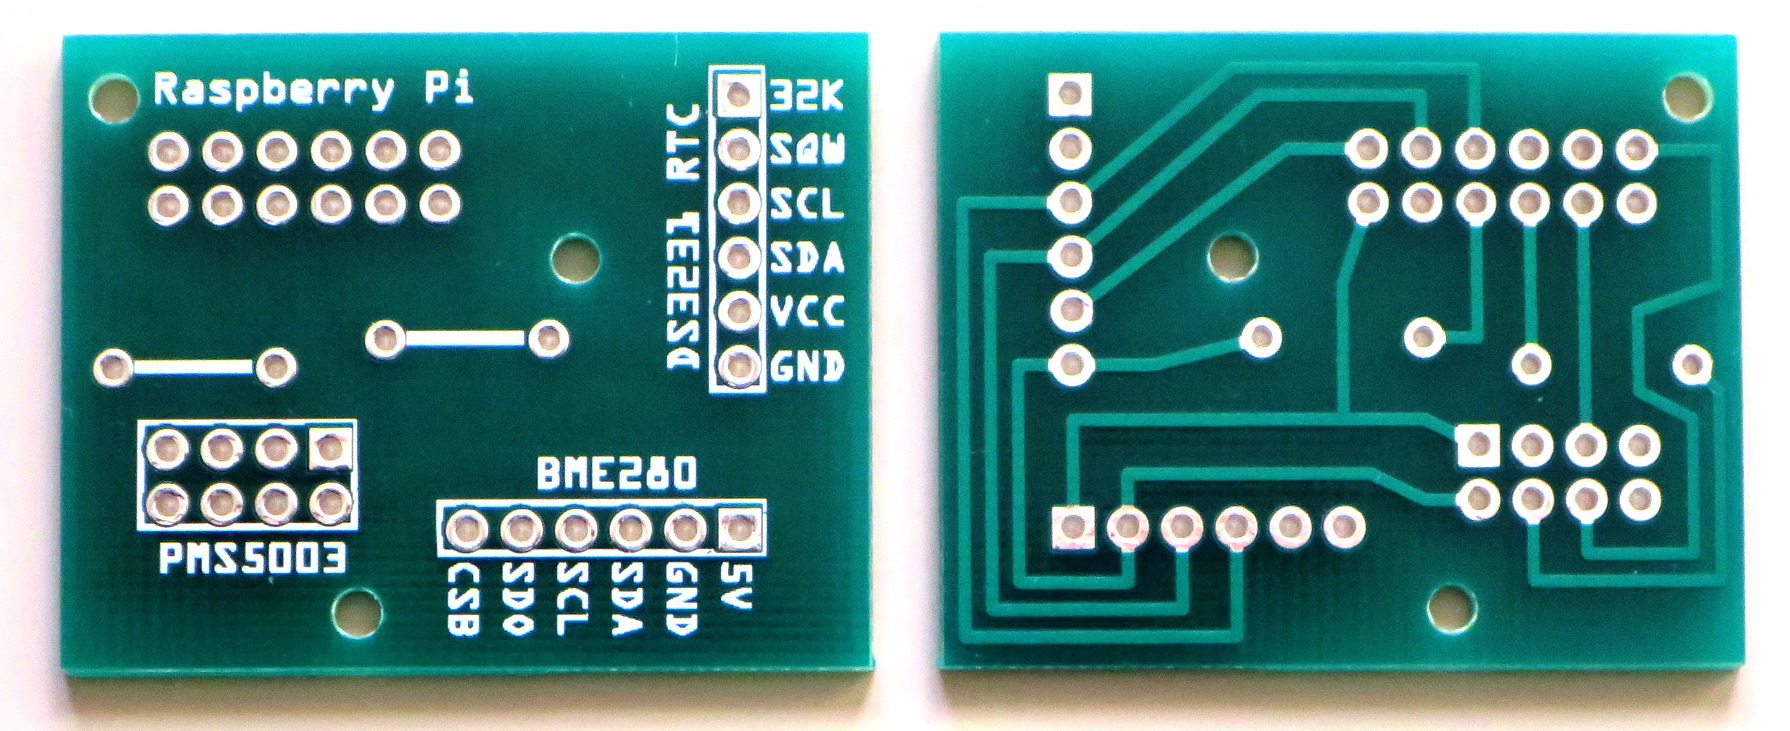
To get a neat and clean circuit we decided to make a PCB, we did not want to weld, plug wires, etc …
ATTENTION This was our first attempt in making a PCB and we make two mistakes:
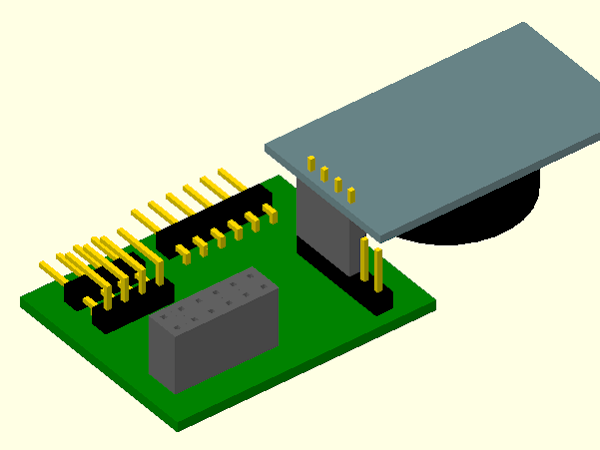
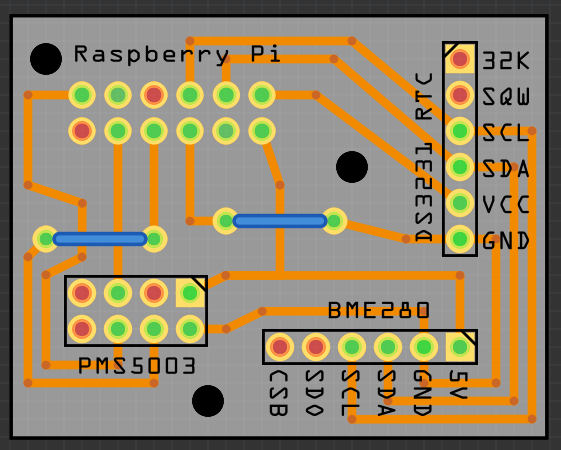
- The circuit is designed as if it were a single layer: the traces are only on the bottom side, two jumpers on the upper side are used to solve crossing. Neverthless the circuit is made with double-layer technology: the holes have copper pad on both sides and they are lined internally with a conductive material. This has allowed to solder the components (connectors) on the bottom side of the circuit and use it as a hat above the Raspberry Pi.
- Because the circuit is used as an hat placed above the Raspberry Pi, the pin female connector is facing down. Also the pin headers are facing down to minimize the overall height. This means that the copper traces would have been better on the upper side of the circuit.
For the prototyping of a circuit, including PCB design, we found that Fritzing is a very nice software (free and open source). We used also OpenSCAD for modeling the PCB, to check sizes and to simulate the assembling of all the parts togheter. On your GNU/Linux computer install the following packages:
- fritzing Easy-to-use electronic design software
- gerbv Gerber file viewer for PCB design
- openscad script file based graphical CAD environment
For hints ant tips see the page about using Fritzing.
Finally we found Pcbway.com, a producer who has produced for us ten copies of the circuit, at a very convenient price: 10 US$ plus DHL shipping from China to Italy (about 25 €!).
Header Pinout
This is the pinout for the PMS5003 sensor header; beware that the cable provided by Plantower has non-standard colors for VCC and GND!
| PMS5003 Pin | Wire Color | R-Pi Pin | ||
|---|---|---|---|---|
| 1 | VCC +5 V | Violet | 4 | 5 V |
| 2 | GND | Orange | 6 | GND |
| 3 | N/C | White | ||
| 4 | RXD | Blue | 8 | TXD |
| 5 | TXD | Green | 10 | RXD |
| 6 | RESET | Yellow | 11 | GPIO17 |
| 7 | N/C | Black | ||
| 8 | N/C | Red | ||
Soldering hints and tips
When performing the solderings, be careful not to use too much tin. Otherwise there is a risk that tin expands to cause a short circuit or a bad isolation with the adjacent pad. After soldering the pin headers and connectors, check the circuit for proper isolation before attaching the components.
Sometimes a bad contact or a bad isolation can lead to problematic reading of the I2C bus, we have experienced even “ghost” (i.e. non existant) devices reported by i2cdetect.
Make a case with laser cutting
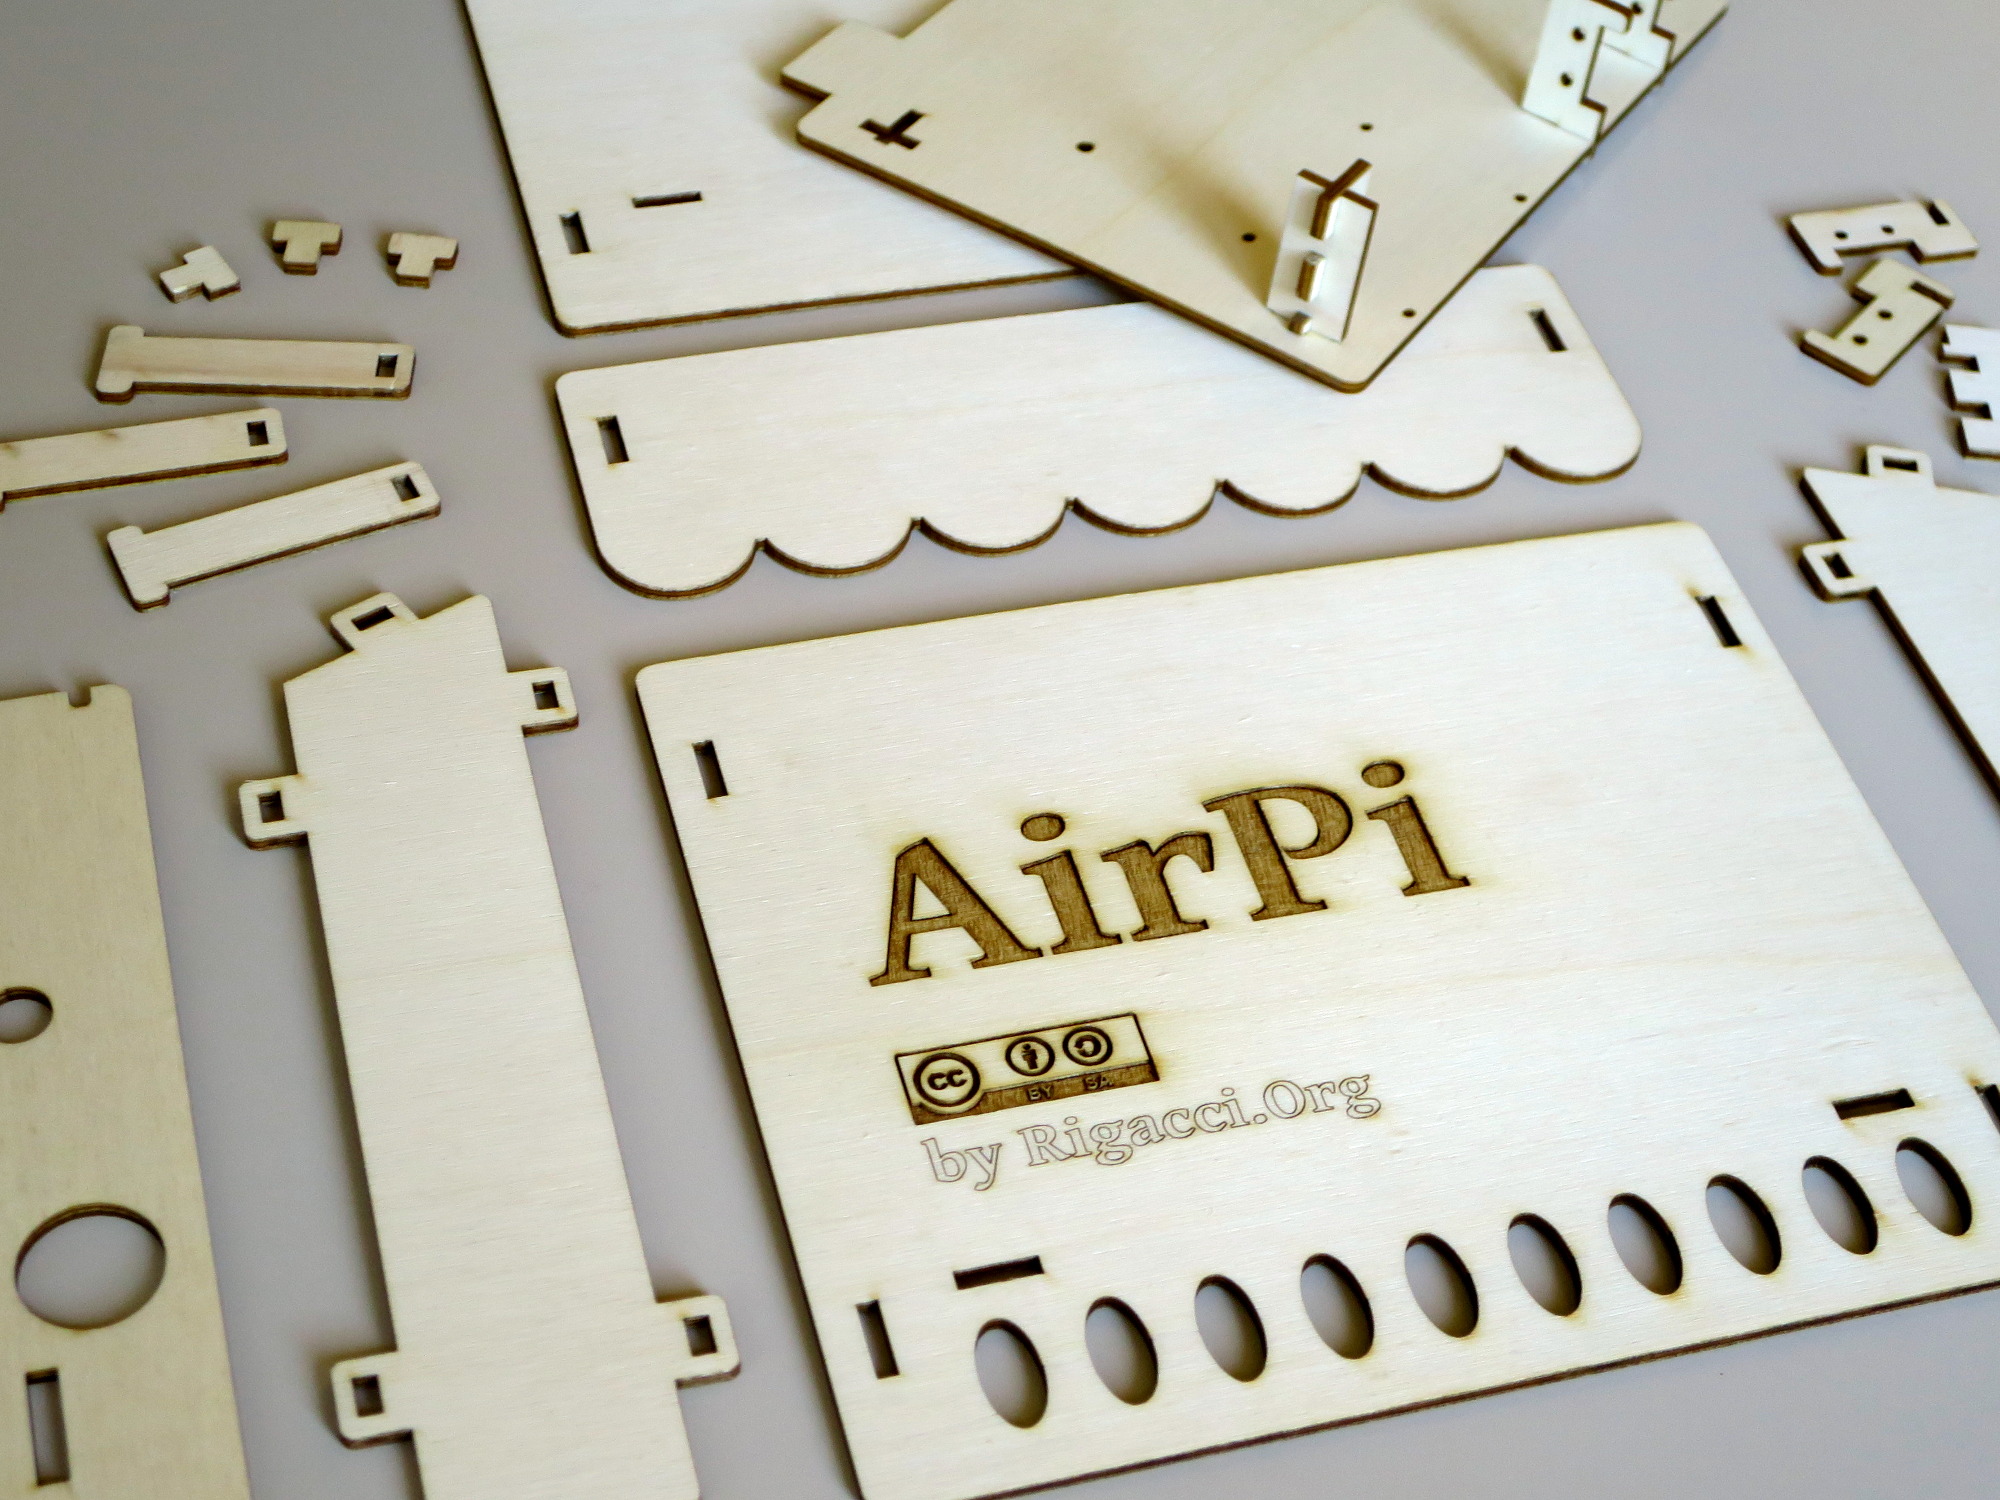
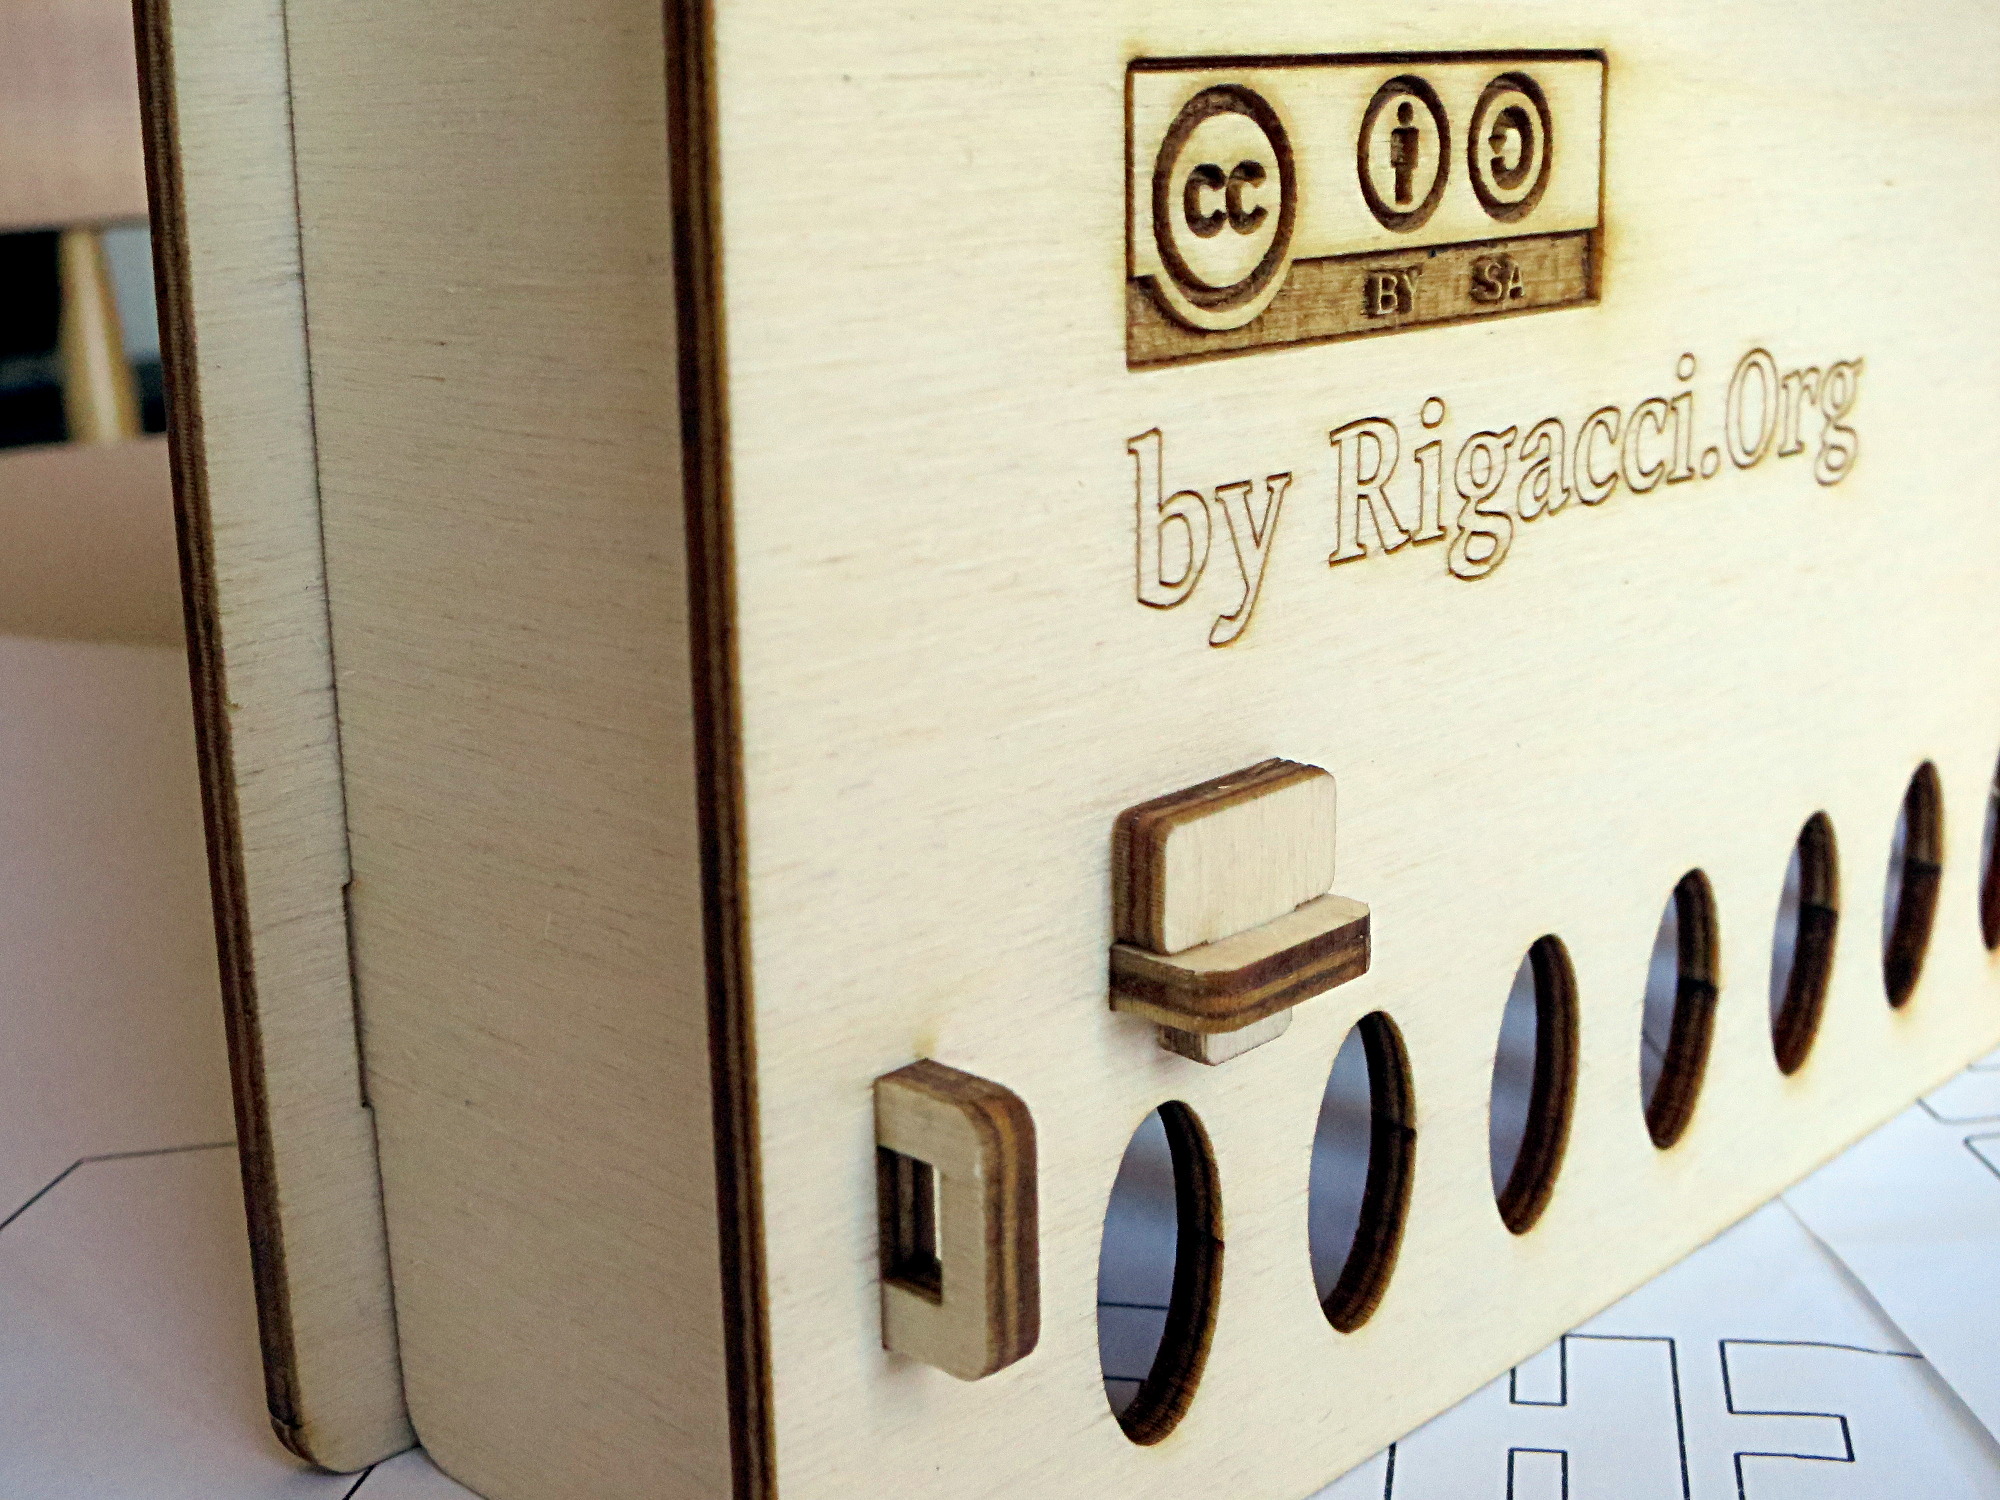
In the above photos the box, made by plywood 3 mm thick. The laser is calculated to make a cut of 0.2 mm width, so each shape is properly enlarged (for outlines) or shrinked (for holes). We also made little notches to make interlockings more tight; they protrudes only by 0.15 mm, laser cutting is precise enough to get an effective result.
We used just two piece of great software (free and open source): OpenSCAD for 3D modeling and Inkscape for 2D graphics and the final layout.
Modeling with OpenSCAD
We tried to do everything parametric: we just set the internal dimensions of the box, the material thickness and some other aesthetic parameters (for example, the slope of the roof). Varying these parameters as we like, the model is automatically re-generated and we can simulate the assembly or observe an exploded view.
We used OpenSCAD (a parametric CAD, free and open source) for both 3D and 2D modeling. Using 3D modeling we checked that everything will fit and interlock properly and we verified how the object will look once assembled. After that, we layed out the 2D shapes onto a plane before exporting to DXF and preparing for the laser cutting service.
In OpenSCAD this is accomplished creating two separate modules for each piece, e.g. for the front panel we have the panel_front() and the panel_front_2d() modules, where the first is just a linear_extrude() of the second, using the proper height, i.e. the thick of the material.
Export to DXF
In OpenSCAD we use the menu Design → Render. If the object is only bi-dimensional it will be rendered with a red outline and cyan filling. Only in this case we will be able to File → Export → Export as DXF….
Using Inkscape to add writings, logos and to layout the pieces
So we used OpenSCAD to make the 2D shapes (exported as DXF), but we want to add some fancy graphics and we need to arrange the pieces according to the manufacturer requirements. We used Inkscape for this task.
To add some text (only the outline, only the fill, or the outline and the fill together):
- Use the Text tool to write something.
- Convert the text object into a path: menu Path, Object to Path.
- Set the stroke and the fill as requested by the laser cutting service. Generally a specific stroke will result into a cut or an engraving, where a specific fill, will result into a filled engraving.
- Save as Inkscape SVG (to avoid potential conversion problems in save and load) or Plain SVG (more compatible) or DXF, as requested by the manufacturer.
To add some graphic:
- Make a shape, set the stroke and the fill for the proper laser effect.
- If you need some holes into the shape: make another shape for the hole, select the outer shape along with the inner shape and click menu Path, Difference or Exclusion.
To lay out the shapes into a single project, you should follow the guidelines of the laser cutting services that you will to use. Generally they provide some templates (Inkscape is well supported), which shows you how big is the cutting area, and the stroke and the fill that you have to use.
More Software Setup
SNMP

#!/bin/sh
SENSORS="temperature pressure humidity cputemp"
SENSORS="$SENSORS pm1.0 pm2.5 pm10 gt00.3um gt00.5um gt01.0um gt02.5um gt05.0um gt10.0um"
for SENSOR in $SENSORS; do
    snmpwalk -v 2c -c public 127.0.0.1 "NET-SNMP-EXTEND-MIB::nsExtendOutput1Line.\"$SENSOR\""
done
Logread Buffer Len
We installed busybox-syslogd instead of rsyslog, so that the system log is stored into a RAM ring-buffer and thus saving SD card write cycles. If you want to have a larger memory buffer (e.g. 2 Mb) put this into /etc/default/busybox-syslogd:
SYSLOG_OPTS="-C2048"
PMS5003 Reset Line
We used the PMS5003 sensor quite extensively for about 9 months, 24h/24h with one reading every 15 minutes and sensor sleep in between: we never registered a failure. Neverthless the sensors has a RESET pin which can be used just in case. The pin is keept high by an internal pull-up resistor, so we can leave it vacant. In our experience it seems also that we can leave it attached to a Rapspberry's GPIO (we used #17) and leave it not initialized.
If you need, we have included the script /usr/local/lib/airpi/pms5003-gpio-set. Run it once at startup to export the GPIO device (i.e. it will be accessible under /sys/class/gpio/gpio17/) and to set it HIGH. In this case the pms5003 controlling program will try a RESET signal if the sensor will became not responsive. Just add the following lines into /etc/rc.local (before the last line exit 0):
# ==== PMS5003 RESET pin ====
# Set the GPIO pin to normal HIGH. The controlling program will bring
# it down for a short time, if device reset is required.
/usr/local/lib/airpi/pms5003-gpio-set high
More on Serial Line (Manual Setup)
If you want a better understandment of serial line setup, here are some notes. You should not need these if you have executed the raspi-config as exposed in Software setup.
We want to attach the PMS5003 sensor to the Raspberry Pi serial line, which is exposed via BCM #14 (TXD) and #15 (RXD) (PIN8 an PIN10 respectively on the Raspberry Pi model B rev.2). So we have to disable the kernel console and the login shell spawned on the serial line itself.
Edit /boot/cmdline.txt and remove the following part:
console=serial0,115200
Then disable the agetty program which provides the login prompt on the serial line:
systemctl disable serial-getty@ttyAMA0.service
Check also that the /boot/config.txt does not disable the serial device, it should contain this (or nothing at all, which is the default):
enable_uart=1
See more details in this paragraph.
There are some options you can set in /boot/config.txt which affect the serial line. Here there are, with their defaults:
enable_uart=1
init_uart_baud=115200
init_uart_clock=3000000
Actually with a clock of 3 MHz clock you get 187500 baud (3000000/16), as reported by setserial. For 115200 baud you can limit the UART clock to 1843200 Hz (check the Baud_base reported by setserial):
setserial -a /dev/ttyAMA0
/dev/ttyAMA0, Line 0, UART: undefined, Port: 0x0000, IRQ: 81
        Baud_base: 187500, close_delay: 50, divisor: 0
        closing_wait: 3000
        Flags: spd_normal

