Table of Contents
GNU/Linux on the Teclast F6 notebook
| CPU | Intel Celeron N3350 (Apollo Lake) 1.10 GHz, number of cores: 2, burst: 2.4 GHz |
|---|---|
| RAM | 8 Gb (option) |
| Storage | SSD 128 Gb (option) |
| Display | 13.3 inch (1920 x 1080) IPS |
| Battery | 38000 mWh |
| Dimensions | 31.90 cm x 21.70 cm x 1.40 cm |
| Weight | 1.28 kg |
Using Debian Live to check GNU/Linux compatibility
Before installing GNU/Linux on the SSD, I tried the hardware compatibility using a Debian Live distribution. Starting from the Debian Live Home Page, I searched the amd64 architecture and the unofficial images which include non-free firmwares. So I downloaded the debian-live-10.6.0-amd64-xfce+nonfree.iso file. The file is to be copied over an USB stick using dd.
Entering BIOS and booting from an USB stick
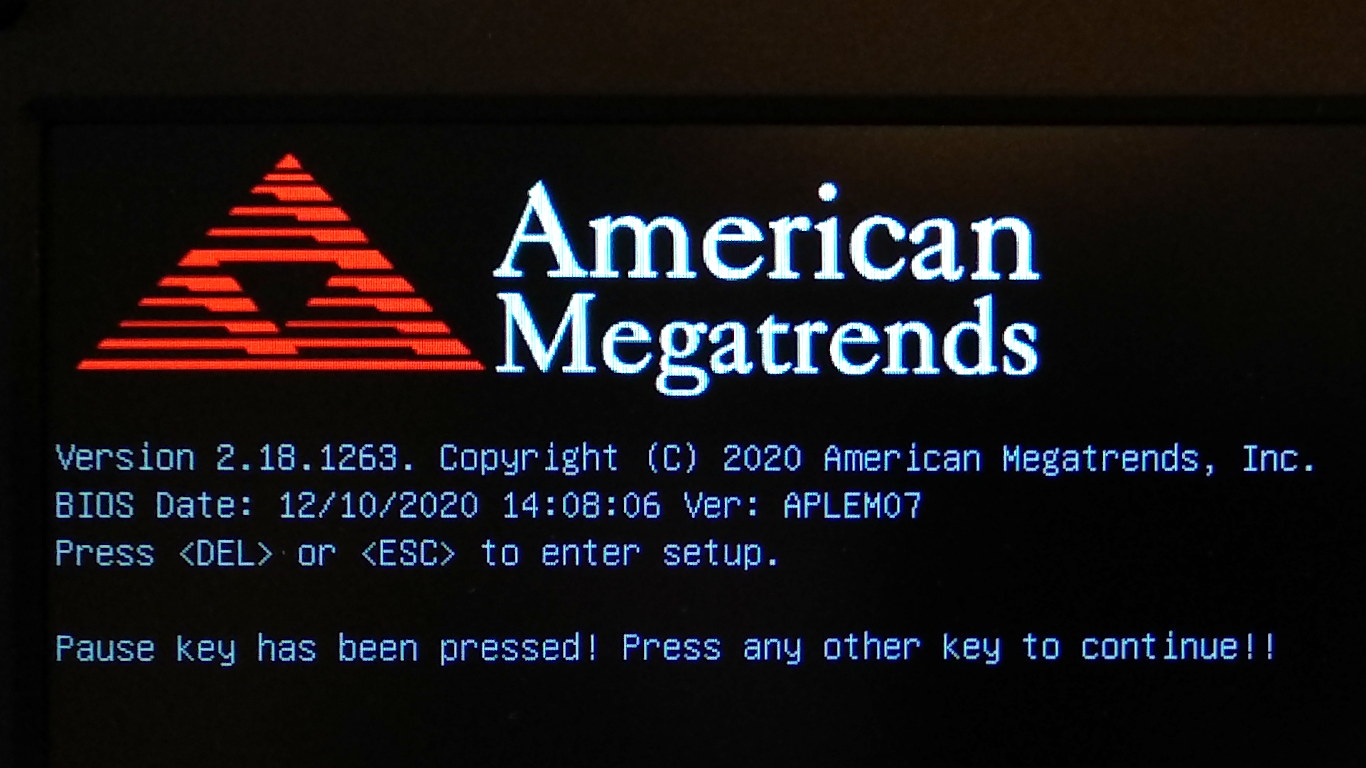
Insert the Debian Live USB stick into an USB port and press the Power key for some seconds untill the green LED lits, then press the Delete or the ESC key to enter the BIOS setup program.
The first setting I made, was to allow the message Press <DEL> or <ESC> to enter setup to be seen during bootstrap:
- Boot
- Setup Prompt Timeout: 4
- Quiet Boot: Disabled
- Fast Boot: Disabled
Then I verified that Secure Boot is disabled, but UEFI boot mode is enabled:
- Security
- Secure Boot
- Secure Boot: Disabled
- Boot
- Boot mode select: UEFI
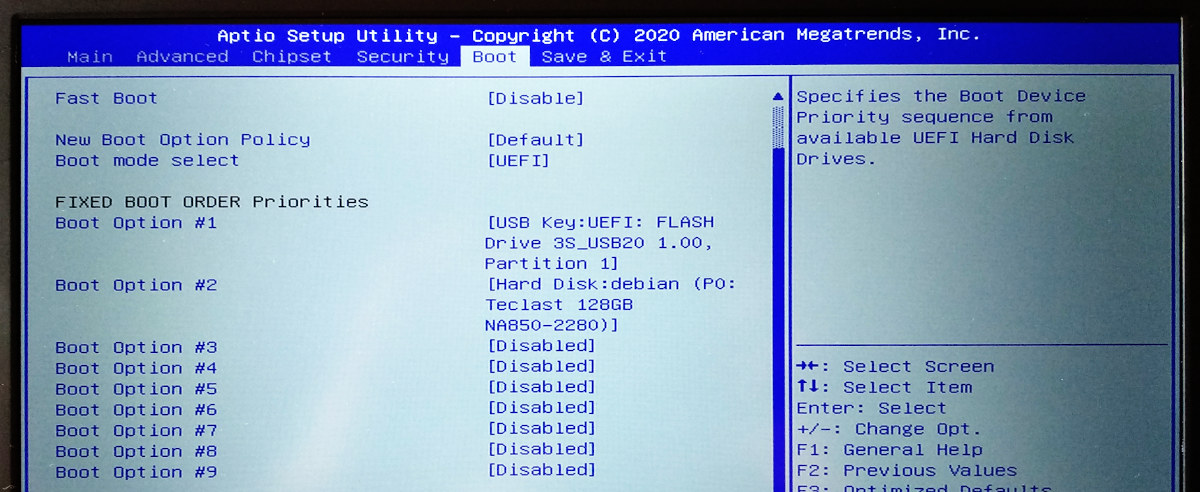
Into the setup progam, navigate to Boot ⇒ FIXED BOOT ORDER Policy and select as Boot Option #1 something like USB Key:UEFI: FLASH Drive 3S_USB20 1.00, Partition 1 (your USB label will be different). As you can see, the notebook sensed the USB stick and detected that it is in USB Key:UEFI format. Other bootable USB images may be of type USB CD/DVD:UEFI (e.g. the Debian Netinst).
Exit the BIOS setup program by choosing Save & Exit ⇒ Save Changes and Reset.
Testing the hardware with Debian Live
With the Debian Live running from the USB key, I have checked the operation of some computer peripherals.
WiFi
Debian Live gives you the NetworkManager Applet to manage WiFi networks: everything works as expected.
Audio
Using alsamixer I set the proper volume for Master and Capture (press F5 to show both), then I used the following commands to check audio playback and audio recording:
aplay /usr/share/sounds/alsa/Front_Center.wav
arecord --duration=10 --format=cd recording.wav
aplay recording.wav
The playback quality is acceptable, given the small size of the speakers positioned under the notebook. The recording instead is quite disturbed by a background noise, infact I had to pull up the capture volume to 75, otherwise the microphone seems to be quite deaf.
Webcam
I installed the guvcview package to test the integrated webcam:
apt-get update
apt-get install guvcview
Once started, the program immediately recognizes the device and starts to display the video. The camera does a decent job about image sharpness and white balance, even in low lit conditions.
Using lsusb -v you can search for the Alcor Micro Corp. device with ID 058f:5608. The camera announce itself as capable of different resolutions: 1600×1200 (4:3 ratio), 1280×720 (16:9 ratio) plus some others with fewer pixels. Selecting a 16:9 mode, the viewing field is cropped along the top and bottom edges, actually reducing it.
Speaking about the image quality: I barely notice some improvements acquiring at 1600×1200 instead of 640×480. Rather guvcview seems to do a better color balance at the lower resolution. The following images were acquired at 1600×1200 and 640×480 respectively (click to view at full resolution):
memtest86+ (does not start)
I tried to execute the memtest86+ RAM test, but I was unable to start it. I tried in three different ways: installing the memtest86+ Debian package once the Debian operating system was installed onto the SSD, I tried to execute the test from the GRML live distro boot menu, finally I tried to write a memtest86+ bootable image to an USB stick and boot from it. In all the cases the PC seems to freeze and the program screen does not appears.
However I was able to boot the GRML amd64 2020.06 live distribution (just plug the USB stick, enter the BIOS and select the relative USB Key:UEFI boot entry). Once booted, the GRML live contains the memtester program, which can be launched asking to test 7 Gb of memory, for three times:
memtester 7000 3
Installing Debian 10
The Debian Live distribution offers the Install Debian incon on the desktop, just click it to start the installation.
Disk partitioning
During the install process, I selected the manual disk partitioning, because I want to specify a separate partition for the /home directory. During that step I removed all the existing partitions, except the UEFI one, which was sda1 with size of 100 Mb and formatted as FAT32; manually I added a mounting point for it under /boot/efi.
UEFI Hard Disk Drive BBS Priorities
At the end of the installation of the operating system, the correct boot priority should be automatically selected. The boot option is choosen from the ones installed by each O.S. installation, into the UEFI partition. Using a GNU/Linux system you can use the efibootmgr tool to list the available options and to set the right priority.
With the following command you can see the existing UEFI system partitions:
efibootmgr -v
BootCurrent: 0000
Timeout: 3 seconds
BootOrder: 0000,0001,0002,0003
Boot0000* Windows Boot Manager  HD(1,GPT,8a1b24b0-6275...
Boot0001  UEFI: Built-in EFI Shell      VenMedia(5023b95c...
Boot0002  debian        HD(1,GPT,8a1b24b0-6275.../File(\EFI\DEBIAN\SHIMX64.EFI)
Boot0003* debian        HD(1,GPT,8a1b24b0-6275.../File(\EFI\DEBIAN\GRUBX64.EFI)
The Debian installation program installed two EFI images: SHIMX64.EFI and GRUBX64.EFI; the first is to be used if Secure Boot is enabled (shim is a simple first-stage bootloader, signed for Secure Boot), whereas GRUBX64.EFI is the standard GRUB image.
If you want to set the priority, you can use a command like this:
efibootmgr -o 0003,0000,0001,0002
In our case the installation program did not properly set the boot priority: Windows was still the first choice. Also an attempt to manually use efibootmgr did not succeded. It was necessary to enter the BIOS setup and adjust the relevant item Boot ⇒ UEFI Hard Disk Drive BBS Priorities (where BBS stands for BIOS Boot Specification):
Power Management and Hibernation
Hibernation (suspend to disk) works: you just have to provide a swap partition large at least as the available RAM.
SSD Upgrade
The Teclast F6 notebook is equipped with an SSD module in the M.2 2280 form factor. The housing accepts only 80 mm length modules, because it has only one screw position. Changing the SSD module is rather simple: just remove two screws and pull-out the cover.
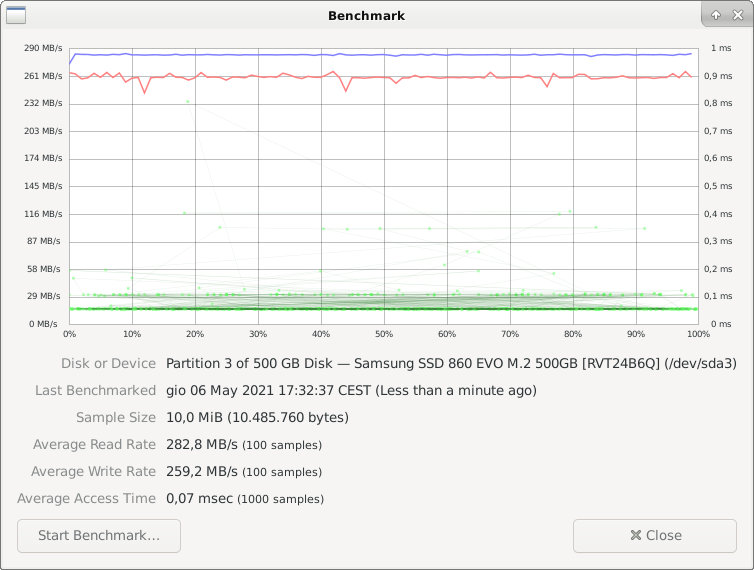
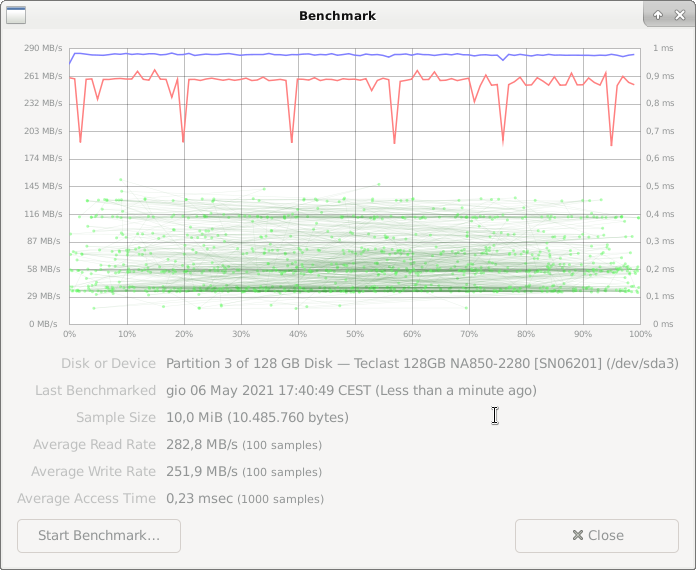
As you can see from the gnome-disks benchmarks below, the new Samsung 860 EVO 500 Gb SSD operates at about 283 Mb/s average read speed and at about 259 Mb/s write speed. On the other hand the factory installed Teclast SSD operates at very similar rates, showing some glitches in writing speed, but with a lower averages access time:
Unsolved Problems
- Keys in the top row of the keyboard are associated to multimedia functions (volume and brightness control, etc.), not to the regular function keys F1, … F12. Function keys are activated pressing them with the blue Fn key. There is not a BIOS option to invert the Fn key behaviour. See this page for a partial workaround: Remap keyboard keys in GNU/Linux.
- The Fn+ESC should be associated to the disable touchpad function (as per the blue label on the key), but it does not work. See this page for a partial workaround: Disable notebook touchpad in GNU/Linx.
- The vendor sells the notebook only with Microsoft Windows 10 Home license included, it does not offer a refund policy and it does not offer an operating system free version.
Controlling backlight from the command line
You can control the backlight level from the command line (root privileges is required to write):
cat /sys/class/backlight/intel_backlight/brightness
cat /sys/class/backlight/intel_backlight/max_brightness
echo 76800  > /sys/class/backlight/intel_backlight/brightness
You can use xrandr to simulate brightness control in software (the image is dimmed, but backlight remains actually the same):
xrandr --output eDP-1 --brightness 0.5
Power Supply
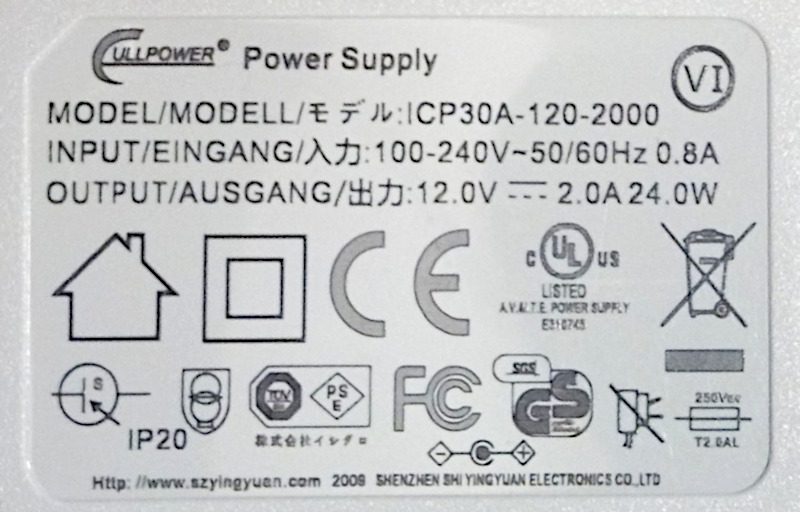
The power supply of the Teclast F6 is a 12.0 V rated at 2.0 A (24.0 W). The coaxial jack has an outer diameter of 3.50 mm.
Battery
After a year and a half of use the battery is practically exhausted: the autonomy of the laptop has gone from the initial 6 hours to about 1 hour and a half.
