Table of Contents
SJCAM SJ8 Pro Custom Firmware
The SCAM SJ8 Pro is a mid-range priced action camera, equipped with chips well known for their quality: the Ambarella H22 S85 and the Sony IMX377 sensor. Still in 2022 it was well placed between the expensives GoPros and the plethora low-end budget cameras. Unfortunately the support from SJCAM was ended in 2020 with the firwmare 1.3.2 still affected by various bugs, image quality and video codec settings definitely to be improved. Also the Adnroid app is disappointing.
Fortunately enough, being equipped with the Ambarella chip, it was possible to reverse engineer some of its firmware and API. Creating a custom firmware you can improve the overall experience. It is important to remember that this took a lot of hard work.
The main honorable mention goes to the hacker VMax, which created the software BitrateEditor.
WARNING: The custom firmware presented in this page is based on the original SJCAM SJ8 Pro firmware 1.3.2 and it was tested only on cameras shipped with that firmware. Newer SJ8 Pros are shipped with a new firmware 1.4.x, unfortunately SJCAM does not longer offer a firmware download service, so it was not possible to reverse engineer and eventually modify the new firmware. Also the old 1.3.2 disappeared from their download site and the procedure to upgrade firmware is not longer described in the support site. It is also suspected that the new models shipped with firmware 1.4.x are based on a different hardware that the 1.3.x ones, so using this firmware on newer cameras can be dangerous (it can bricks the cam!).
See my other page about the SJCAM SJ8 Pro action camera:
My Custom firmware
Download the custom firmware here:
This is a breif list of customizations, see the README.txt contained into the archive for more details:
- Increased bitrates, as per other 4K action cameras. Particular attention to default settings and 1920×1080 mode.
- Increased keyframes rates (reducing GOP-N): one keyframe every 1/4 second instead of 1 per second.
- YUV color profiles: all the three profiles Default, SJCAM - Vivid and Flat are made equals and neutral; multiplier is 1 and offset is zero for all the three Y, U and V components (shoul be actually Y, Cb and Cr when treating digital signals). This is because in my opinion the original Vivid is too much saturated and the FLAT is too much washed out, plus the management of the color profiles has some bugs and it is best to avoid fidding with them.
- Fixed exposition profiles: Center, Spot and Average (Spot and Average are swapped into the original firmware!).
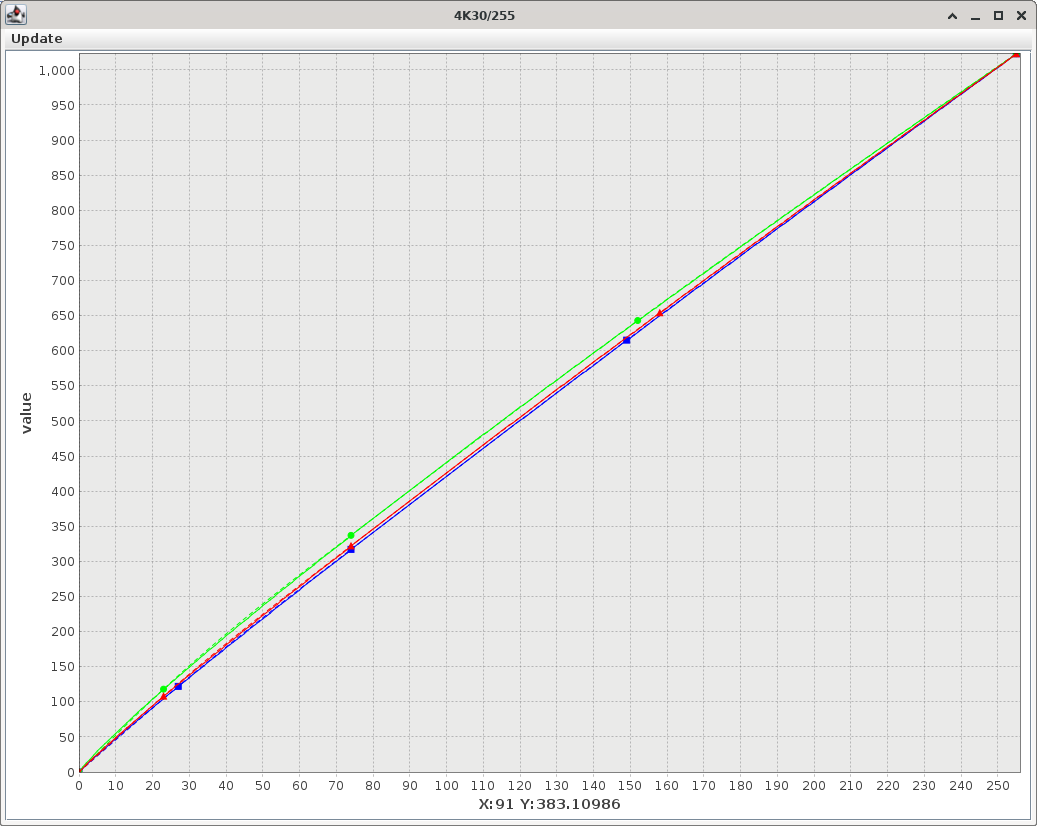
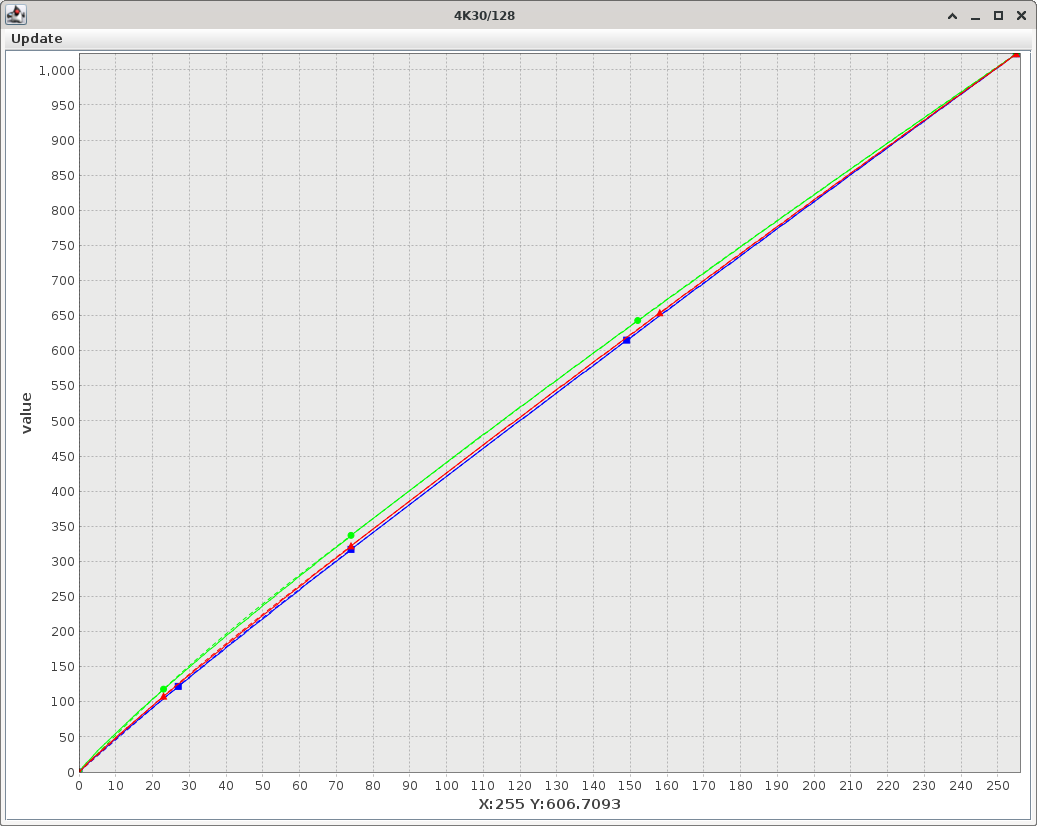
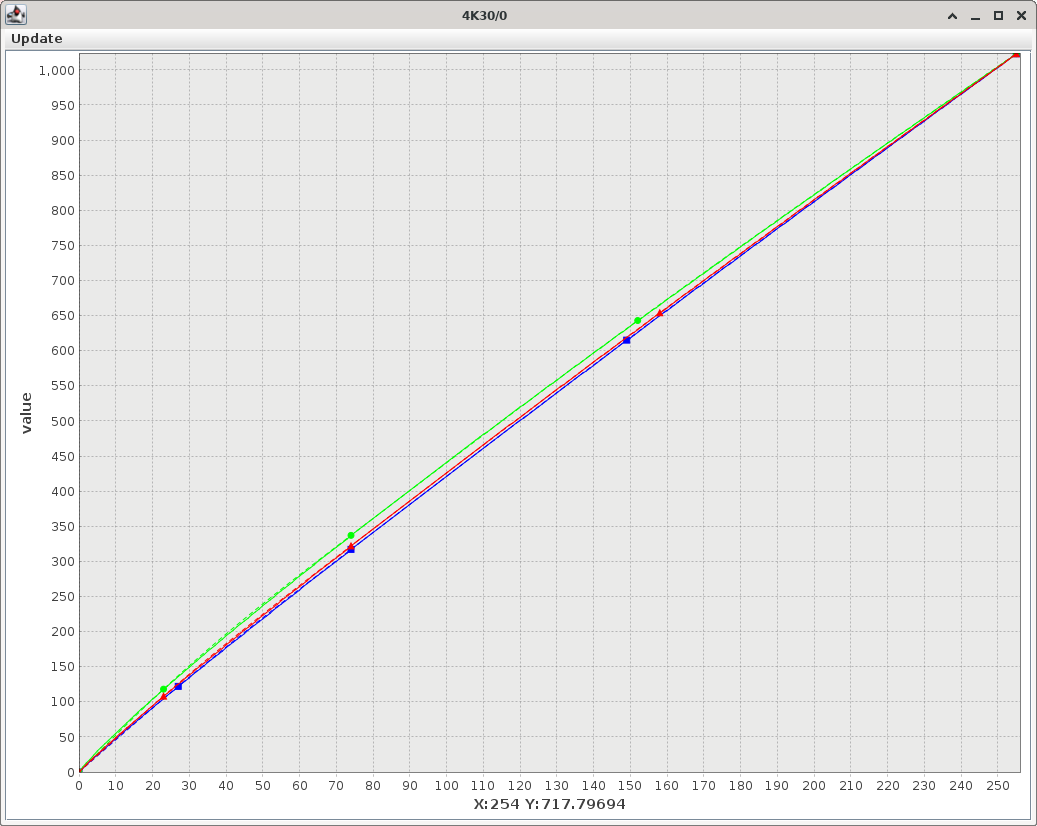
- Changed gamma curves: added some brightness to shadows with an overall gamma coefficient of 1.10 and removed a slight red casting when using Auto White Balance in early hours of sunny days. All the gamma tables for video modes are the same, for photo modes we leaved a linear gamma (1.0) for R, G and B.
- Change chroma curves to reduce banding in blue sky and to attenuate over-saturated colors.
- Changed power-on, power-off and photo shutter sounds with louder ones.
- Disabled LRV (low resolution videos) recording.
Bitrates
The SJ8 Pro camera has by default very low bitrates compared with other 4K action cameras. In the following table you can compare three cameras in various video modes. My custom settings are geared to always keep the standard quality and to film mainly at 1920×1080, to save space and battery.
| Bitrates | |||||||||
|---|---|---|---|---|---|---|---|---|---|
| SJCAM SJ8Pro | Xiaomi Yi 4K+ | DJI Osmo Action 4K | My Custom SJ8Pro |
||||||
| Video Mode | Eco | Std | Fine | Default | S-Fine | Default | Eco | Std | Fine |
| 4K@60 | 50 | 60 | 100 | 100 | 135 | 100 | 80 | 100 | 120 |
| 4K@30 | 30 | 40 | 60 | 60 | 100 | 100 | 46 | 72 | 98 |
| 2.7K@60 | 46 | 60 | 72 | 60 | 75 | 100 | 40 | 60 | 80 |
| 2.7K@30 | 24 | 34 | 52 | 45 | 60 | 82 | 30 | 48 | 60 |
| 1440@60 | 24 | 30 | 36 | 60 | 75 | 36 | 56 | 76 | |
| 1440@30 | 24 | 30 | 36 | 45 | 60 | 28 | 46 | 58 | |
| 1080@120 | 44 | 58 | 74 | 60 | 75 | 100 | 40 | 60 | 80 |
| 1080@60 | 24 | 30 | 36 | 45 | 60 | 82 | 30 | 48 | 60 |
| 1080@30 | 18 | 24 | 30 | 45 | 60 | 36 | 24 | 38 | 48 |
| 720@240 | 24 | 30 | 36 | 60 | 75 | 100 | 40 | 60 | 80 |
NOTICE: For bitrates of 100 Mbit/s or above you have to consider the micro SD card performances. Recording a stream of 100 Mbit/s means writing a sustained stream of 12 Mb/s (megabytes/second). Checking the speed class ratings from the Wikipedia SD card page, you understand that you need at least a V30 Video Speed Class, or U3 UHS Speed Class.
Bitrates GOP
I want at least 4 keyframes per second, so I can cut scenes without re-encoding with the precision of about 0.25 seconds. The original firmware instead put only a keyframe every second.
| GOP-N Values | ||||||
|---|---|---|---|---|---|---|
| FPS | 24 | 25 | 30 | 60 | 120 | 240 |
| SJ8Pro Default | 24 | 32 | 32 | 64 | 120 | 240 |
| My Custom SJ8Pro | 6 | 8 | 8 | 16 | 32 | 64 |
WARNING: The 240 FPS mode is actually a fake! If you check such a video you can see that every 4 frames only the first is unique, the other three are duplicated: 240 FPS is actually 60 FPS.
YUV Profiles
For my taste the two YUV profiles proviede by the stock 1.3.2 firmware are both too exagerated: the Vivid - SJCAM profile has too much contrast and colors are too much saturated, something that is eye-catching on a small smartphone screen, but is rather disturbing on a larger and good quality screen. By contrast the Flat profile is so washed-out that you almost never want to use it.
In my custom firmware I reduced contrast and saturation by changing gamma and chroma tables, so I decided to make all the YUV profiles neutral and equals. In this manner I cannot select by mistake an useless profile, like the factory Flat. This choice was preferred also due the fact that the user interface does not correctly report the YUV profile currently selected; if you select Flat you still read SJCAM - Vivid into the menu. A neutral YUV profile is obtained by setting the multiplier to 1024 (which means a slope of 1.0) and the offset to zero.
| SJCAM SJ8Pro Default | My Custom SJ8Pro | |||||
|---|---|---|---|---|---|---|
| Default | Vivid | Flat | Default | Vivid | Flat | |
| Y | 1024 | 1024 | 690 | 1024 | 1024 | 1024 |
| U | 1024 | 1024 | 820 | 1024 | 1024 | 1024 |
| V | 1024 | 1024 | 820 | 1024 | 1024 | 1024 |
| Y-offset | 0 | 0 | 40 | 0 | 0 | 0 |
| U-offset | 0 | 0 | 0 | 0 | 0 | 0 |
| V-offset | 0 | 0 | 0 | 0 | 0 | 0 |
Exposition
Metering tables were fixed, this simply means swapping profiles Spot and Average.
Gamma curves
There is no documentation on how the */255, */128 and */0 groups are mixed together, from my experiments it seems that:
- Group */0 is not used at all.
- When using dynamic ISO modes, groups */255 and */128 are mixed together: the table */255 is used for highlights and the table */128 is used for shadows. It is very likely that you will obtain color banding if gamma curves are not accurately tuned.
- When using fixed ISO modes it seems instead that groups */255 are the only ones used.
- It seems that in some particular circumstances (some color component of */255 is very dark) the gamma curve is replaced automatically with something different, may be a negative (descending) curve.
I initally made a firmware where the original gamma curves were replaced with neutral values. Each curve was replaced with an ascending linear line, it means a gamma value of 1.0 (i.e. no actual gamma transformation). Also the YUV coefficients were made all neutral: the multipliers are set to 1024 (which means a slope value of 1.0) and the offsets are set to 0. Using that firmware I filmed a color checker board and then I calculated a spline interpolation line for each RGB channel that will do a white balance on the color checker gray scale. I also filmed some real scenes including tarmac roads to be used as gray reference, then I imported some selected frames into the GIMP and used the Color Levels to make a manual gray balance on the screen. I repeated that procedures using the Sunny White Balance and the Auto White Balance setting of the camera.
It turned out that using the Auto White Balance is almost perfect for videos taken at mid-day hours of sunny days. Instead when using the Sunny White Balance, the blue channel should be reduced in shadows and augmented in highlights, the contrary is necessary for the green channel. After countless hours doing color checking, spline interpolations, linear regressions and flashing of custom firmwares, these are my conclusions:
- The camera is rather good in automatic withe balancing.
- The camera produces rather fair colors when set with neutral gamma tables and neutral YUV profiles.
- The stock firmware have somewhat exagerated saturation and contrast, just simply reducing them produces a better video quality (in my humble opinion).
- The non-automatic white balance settings (e.g. sunny, cloudy, etc.) produce some un-natural color casting. It is possibile to correct it using gamma or YUV, but if you fix e.g. the sunny white balance, you will break the others, including the auto mode.
Finally I decided to favor the automatic white balance setting: first of all I set a gamma value of 1.10 on all the RGB channels to reduce shadows, then I added some gray balance using the gamma values (0.973, 1.013, 0.960) for the three RGB channels. This correction penalizes the images taken in the central hours of the day, but in my opinion it is better for the ones taken in the morning and in the afternoon.
The curves so calculated were loaded for all the video modes tables: */255, */128 and */0 (despite the latter seems not used at all). For photo modes I leaved a linear gamma (no transformation at all), because I prefer to do color balancing in post-processing.
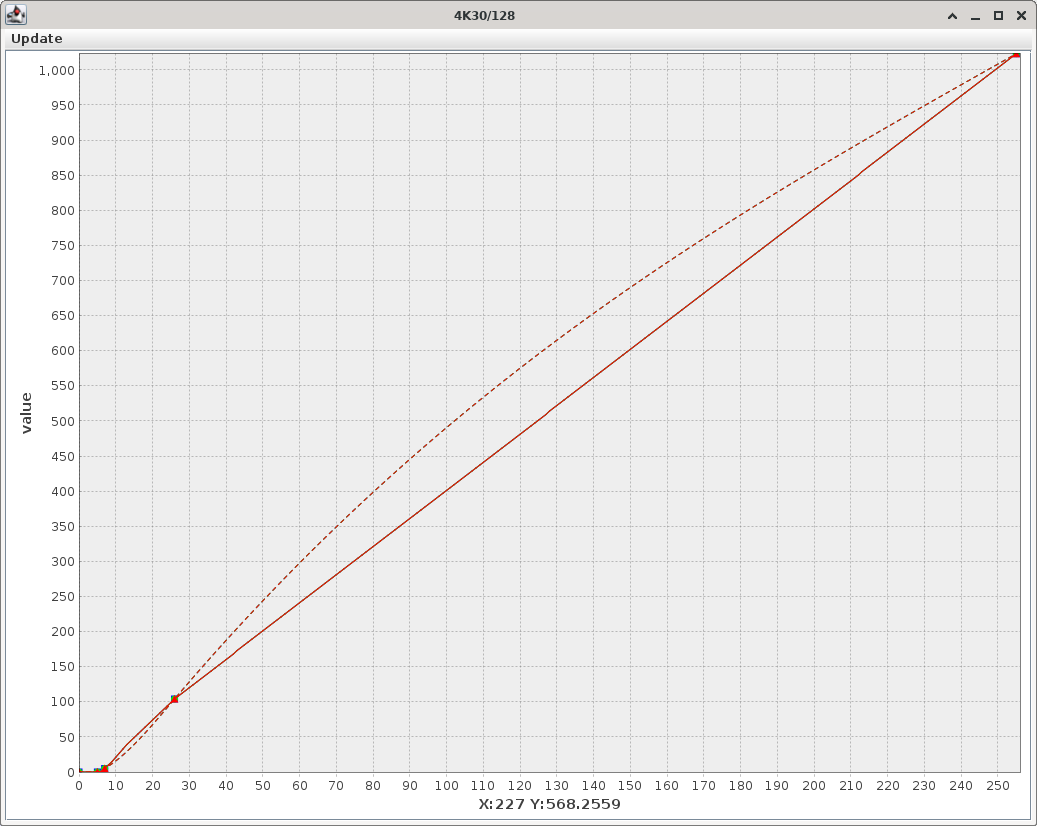
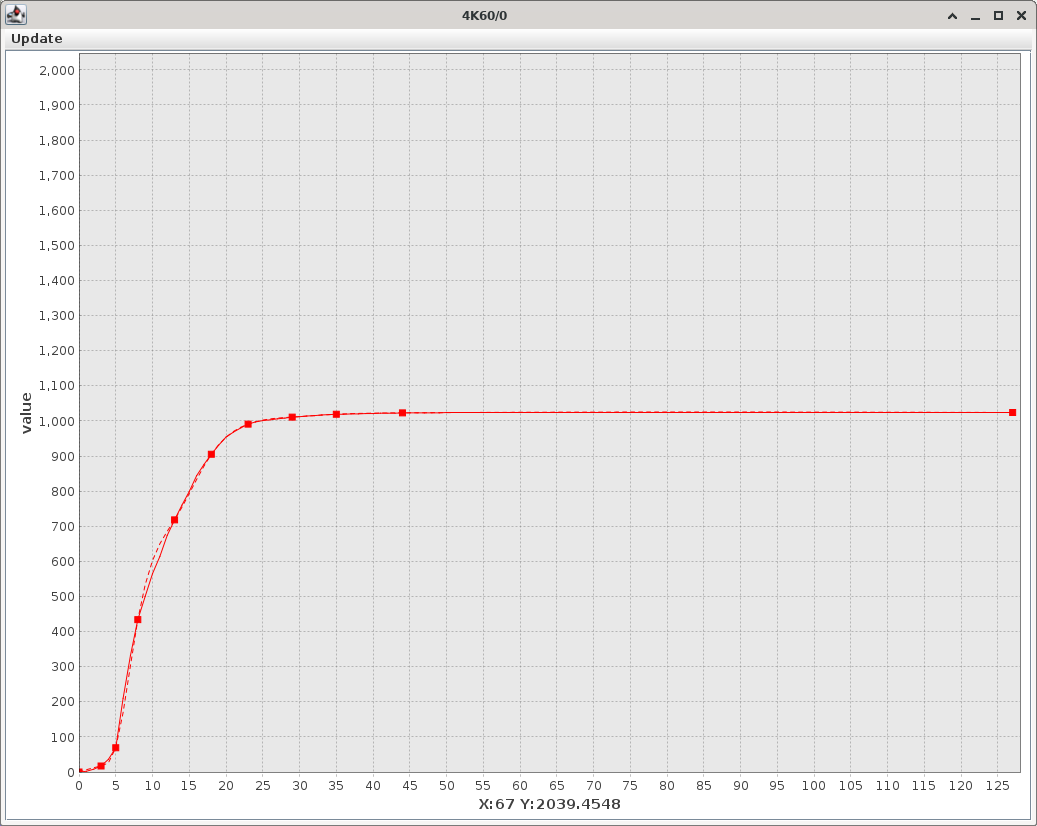
As you can see from the following graphs, my custom gamma curves have just a little deviation from the neutral 1.0 gamma:
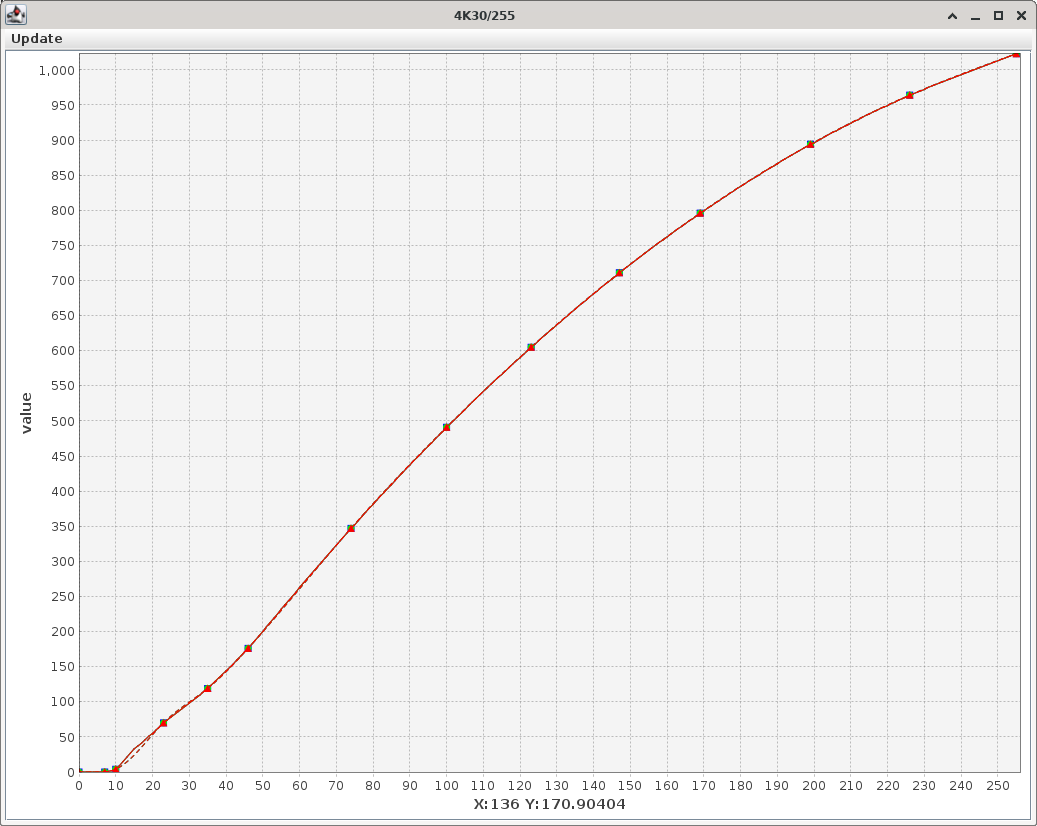
The gamma curves of the original 1.3.2 firmware do instead boost the image contrast by darkening the shadows and brightening the highlights:
Chroma curves
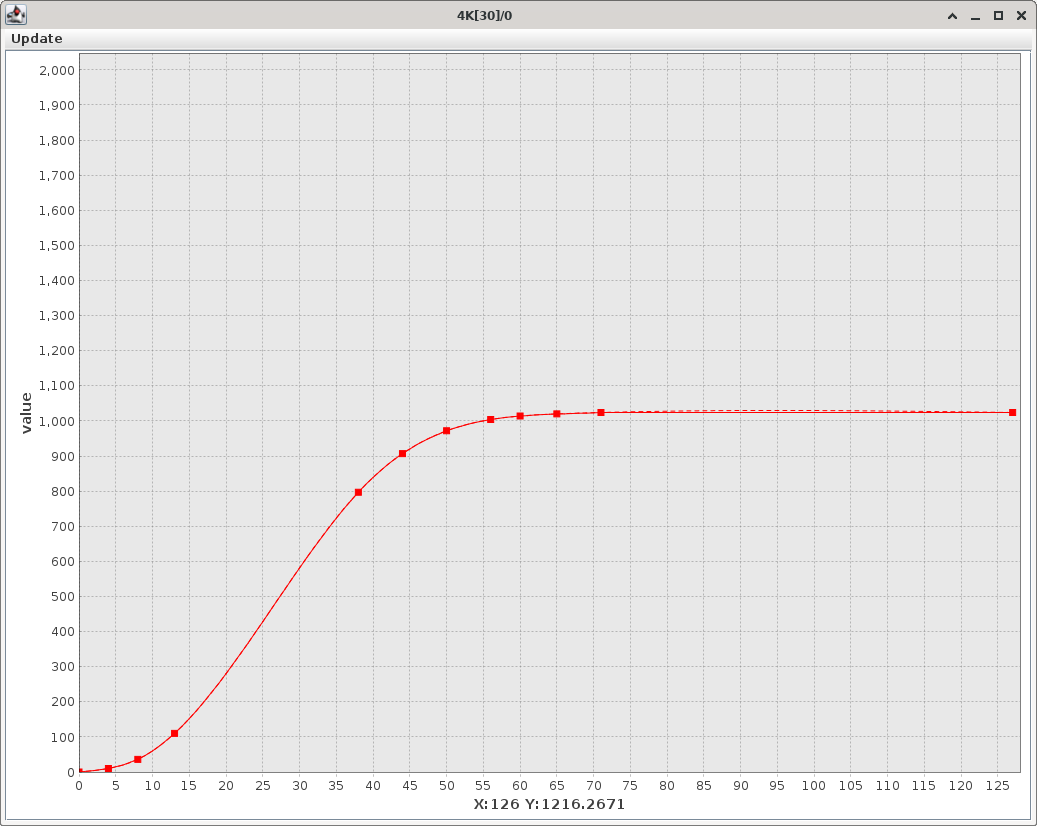
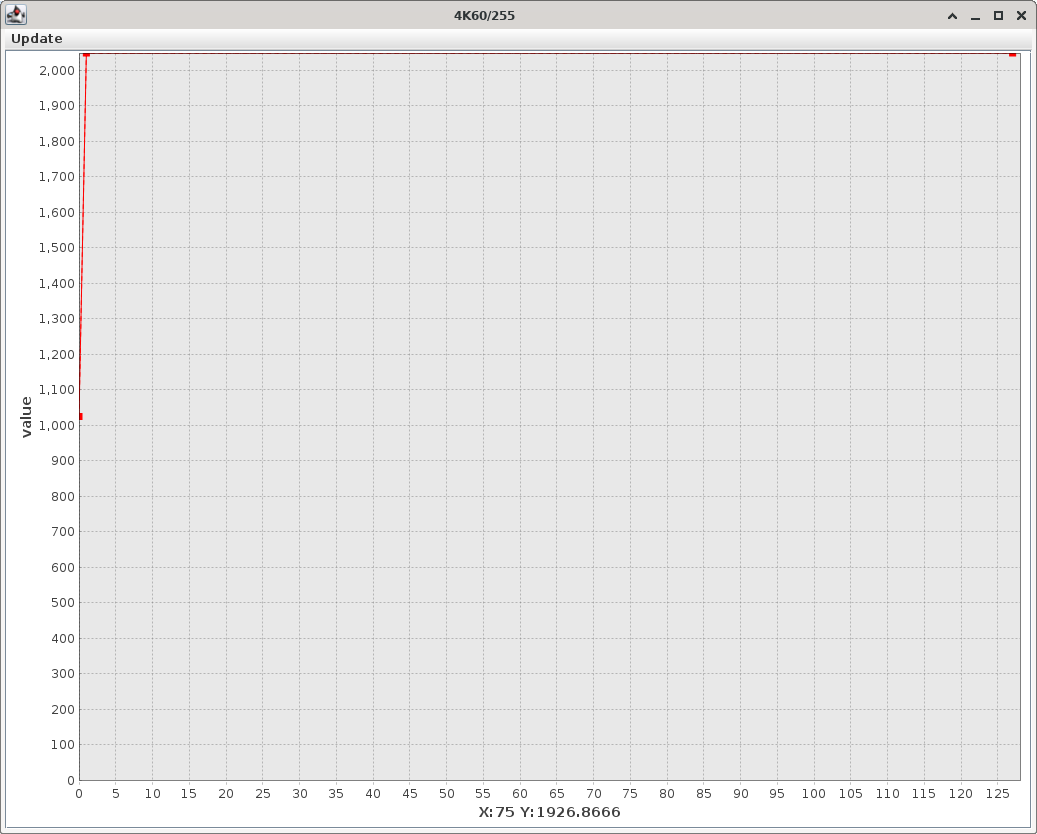
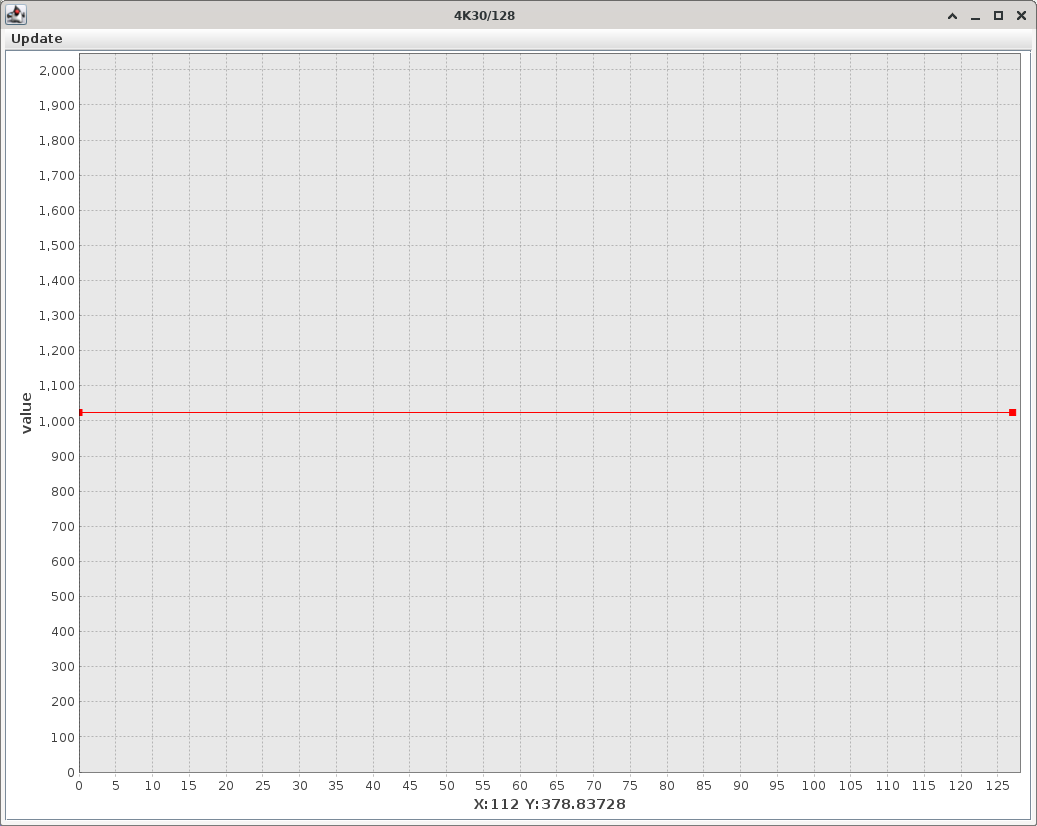
I think that the original chroma curves programmed into the SJ8 Pro are responsible for the over-saturated colors and for some annoying banding often visible in the blue sky. I changed the curves reducing smoothly the graph toward the highlights for the table */128 (used for evenly exposed parts of the image) and increasing smoothly the graph starting from the shadows for the table */0 (used for over-exposed parts of the image). Based on my testing the table */255 is responsible for very low chrominance applied only for heavy under-exposed images, so I leaved the original graph, which is a straight line all at the maximum value.
In the following images you can see my custom chroma curves:
You can compare them with the stock chroma curves, from the original 1.3.2 firmware:
As far I can understand, the original curves */128 and */0 produce an over-saturation of colors in brigther areas of the image; this produces a sky that is often too light, with white clouds losing detail and becoming single white blobs.
Sounds
I changed the original sounds for power-on, power-off and photo shutter with something more audible. They are simple and loud beeps, but with different patterns, so they can be distinguished.
autoexec.ash
The autoexec.ash file is not actually part of the firmware; if you want you can copy it into the root directory of the SD card. It is written in Ambarella Shell and it is executed at camera power on.
The autoexec.ash file included into the archive consists of a single line of code to disable the recording of the .LRV (low resolution video) files into the SD card. I don't use them at all, so it is a waste of space and CPU/battery to create them.
