Table of Contents
Rooting the Oukitel WP12 Android Phone
![]()
![]()
![]()
![]()
![]()
Rugged Android smartphone, pourchased in August 2021 at about 140 €, getting root privileges was rather easy.
| | New Android 11. 4 Gb RAM. 32 Gb Flash. 4000 mAh Battery. Easy rooting. Protected from dust and water immersion IP68. |
| | Outdated screen resolution 720×1440. Non replaceable battery. Notification LED does not exists. Poor screen protection due non raised border. |
| Model | Oukitel WP12 |
|---|---|
| Size | 174x81x14.3 mm, weight 237 g |
| RAM | 4.0 Gb |
| Internal Memory | 32 Gb |
| CPU | MediaTek Helio A22 - ARM Cortex-A53 1.8 GHz, 4 core |
| Screen | 5.5 inches, 720 x 1440, brightness 350 cd/m² typical |
| Battery | Non replaceable 4000 mA |
| Connector | Micro USB |
| Audio jack | 3.5 mm |
| Android | 11 |
| Build | alps-mp-r0.mp1-V8.67 |
| Aggiornamento sicurezza | April 2021 |
| Numero build | OUKITEL_WP12_EEA_V09_20210416 |
| A/B (Seamless) System Updates | Yes, current-slot: a Verified with fastboot getvar current-slot |
| Anti-Rollback Protection | GetVar Variable Not found Verified with fastboot getvar anti |
Rooting
A quick resume of the rooting process:
- Unlock the bootloader (causes a factory reset).
- Get a copy of the bootloader boot_a.img and of the Verified Boot partitions vbmeta_a.img, vbmeta_system_a.img, vbmeta_vendor_a.img using the SP Flash Tool program.
- Patch the
boot_a.imgfile using Magisk on the phone. - Flash the patched image back to the phone.
- Flash the vbmeta partitions using the --disable-verity --disable-verification options.
Install the ADB tools on the PC
On your GNU/Linux box install the Debian packages adb and fastboot, you will get the same-named command line tools. Both programs are at version 8.1.0, as provided by Debian 10 Buster.
Enable Developer options and USB debugging
First of all we need to enable the developer options:
- Settings ⇒ System ⇒ About phone (in Italian: Impostazioni ⇒ Sistema ⇒ Informazioni sul telefono).
- Tap 7 times on Build number (Numero build), untill you get the message You are now a developer (Ora sei uno sviluppatore in Italian). The PIN is eventually requested.
To check that the developer options are actually enabled, verify that a new menu is exposed:
- Settings ⇒ System ⇒ Developer options (in Italian: Impostazioni ⇒ Sistema ⇒ Opzioni sviluppatore).
Now it is possible to enable the USB debugging option:
- Settings ⇒ System ⇒ Developer options ⇒ USB debugging (in Italian Impostazioni ⇒ Sistema ⇒ Opzioni sviluppatore ⇒ Debug USB).
Quando si connette un PC tramite cavetto USB, sul telefono viene chiesto Consentire debug USB?. La domanda è specifica per ogni PC diverso connesso, che viene identificato da un fingerprint. Una volta concessa l'autorizzazione sarà possibile dal PC eseguire dei comandi del tipo:
adb shell
Booting in fastboot or recovery
- Turn off the device
- Press VolumeUp + Power buttons for about 4 seconds, untill the Select Boot Mode menu appears.
- Using VolumeUp you choose the menu item Recovery, Fastboot or Normal.
- Using the VolumeDown you confirm the choice.
Alternatively, once you have enabled the USB Debug option, from a PC connected over an USB cable you enter the command:
adb reboot bootloader
When you are in fastboot mode, on the phone display you can see a small write:
=> FASTBOOT mode...
You can view some of the commands available in fastboot mode in this paragraph. To terminate the fastboot mode, press the power button for 12 seconds.
Unlock the Bootloader (causes a factory reset)
The process requires two steps:
- Enable the OEM unlocking option in Settings.
- Execute the command fastboot oem unlock in fastboot mode.
First of all enable the relevant option in Settings ⇒ System ⇒ Developer options ⇒ OEM unlocking (in Italian is Impostazioni ⇒ Sitema ⇒ Opzioni sviluppatore ⇒ Sblocco OEM). Then reboot in fastboot mode using this command from the connected PC:
adb reboot bootloader
From the PC check if the unlock ability set as above, is actually enabled:
fastboot flashing get_unlock_ability
(bootloader) unlock_ability = 16777216
If you forget to enable the settings option, you will get the following message:
fastboot flashing get_unlock_ability
(bootloader) unlock_ability = 0
If the ability is enabled, you can unlock the bootloader:
fastboot flashing unlock_critical
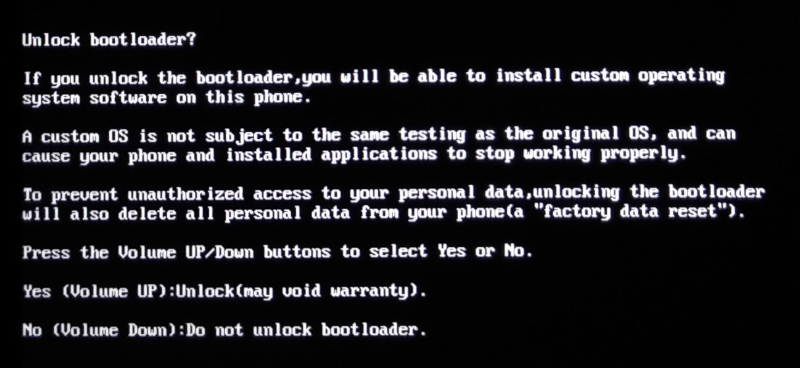
The phone will show a warning message, you have to accept pressing VolumeUP:
Once you have accepted the unlock, you can reboot the phone. A warning message will appear during bootstrap, informing that the phone is in Orange State:
Then the phone proceed with a factory reset, cancelling all the user data and customizations. Because of the factory reset, you have to repeat the following steps:
- Enable Developer otions
- Enable USB debugging
Install SP Flash Tool v5 on the PC
We downloaded SP_Flash_Tool_v5.2124_Linux.zip from https://spflashtools.com/ (we did not use version 6, because we were not able to read the scatter file with it). Unfortunately that version of SP Flash Tool requires a Linux kernel 4.19.14 or above, our Debian Buster had version 4.19.181, but which is detected as 4.19.0, so the program refuses to start. We had to download and install kernel 5.10.0 from Buster backports.
The program can be run by a non-privileged user, just add your user to the dialout group, so it can access the /dev/ttyACM0 device.
Read the boot_a.img from the phone
To fully operate the SP Flash Tool on your phone, you need the original firmare from Oukitel, which includes the images of the partitions and the scatter file. The scatter file is just the map of each partitions into the phone's memory, with the partition name, the physical start address and the partition size. You can get the original firmware from the Oukitel download site, see below.
However, to root the phone, you only need to backup a single partition and re-flash it after patching it. So you actually need only the scatter file. WARNING! Do not use a scatter file from another phone! Memory addresses may be totally different and you can brick your phone by writing outside the correct memory region!
- Uncompress the firmare: you get the TE656_OQ_S86_61_R0_EEA_V1.9.1_S210416 directory.
- Start the SP Flash Tool 5.2124 by running the flash_tool.sh script.
- From the Download tab, click to choose the Scatter loading file and point to the MT6761_Android_scatter.txt file inside the firmare directory.
- If the scatter file is parsed correctly, you get the complete table of partitions, with Name, Begin Address and End Address.
- For rooting you need to read the boot_a partition into a file: click the Readback, Add and fill the required info: name boot_a.img, start address 0x1c000000 and length 0x2000000.
- Power-off the phone and disconnect the USB cable.
- Click on Read Back button.
- Connect the phone on the USB cable, the readback procedure should start automatically and the file will be saved (33554432 bytes, MD5SUM is c007184848c5462d9dbeb90cf8b62b77).
Problem executing SP Flash Tool on some notebooks
I got some problems reading images from the phone to the PC (the readback operation); the process stops after a few percent and I get the following debug log (enable log in program options):
[Tid0x00007f0af7006700] [error] ./dagent/device/protocol/data_mux.cpp(177):
Throw in function void data_mux::worker()
Dynamic exception type: boost::exception_detail::clone_impl<runtime_exception>
std::exception::what: Data flow disorder. 0x4CDDDF61 is not magic number 0xFEEEEEEF
I got the above error on both an Acer and a Teclast F6 notebooks. No problems instead running the same software (with the same Debian 10 Buster operating system) on my HP Compaq Elite 8300 desktop.
Read vbmeta_a.img, vbmeta_system_a.img and vbmeta_vendor_a.img images
In the same manner as you have downloaded the boot_a.img file, you have to readback from the phone the the vbmeta_* images too. The full list of images to readback is:
- boot_a.img
- vbmeta_a.img
- vbmeta_system_a.img
- vbmeta_vendor_a.img
Install Magisk on the phone
- Download Magisk-v23.0.apk
- Copy the file to phone sdcard
- Grant the install from unknown sources permission to Files by Google
- Install the apk file.
Patch the boot_a.img with Magisk
Copy the boot_a.img to the internal storage of the phone
adb push boot_a.img /sdcard/Download
- Start Magisk v23
- Tap the Install item
- Choose the Select and Patch a File option (Seleziona e aggiorna un file in Italian).
- Choose the boot_a.img uploaded to the phone.
- Tap LET'S GO (Andiamo!)
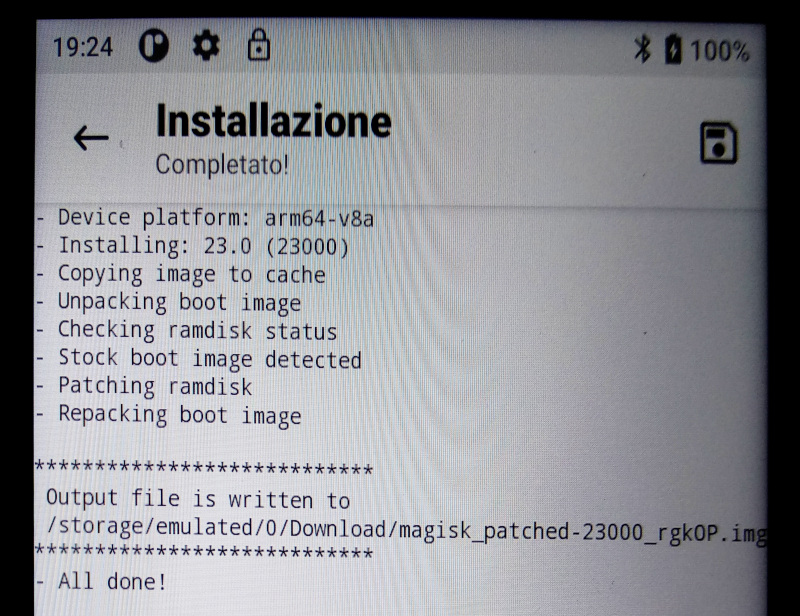
The output will be:
Flash the patched boot image to the phone
fastboot flash boot_a magisk_patched-23000_rgkOP.img
target reported max download size of 134217728 bytes
sending 'boot_a' (32768 KB)...
OKAY [  1.654s]
writing 'boot_a'...
OKAY [  0.429s]
finished. total time: 2.083s
If you forgot to unlock the oem, you will get the followingo error message instead:
writing 'boot_a'...
FAILED (remote: not allowed in locked state)
Now you have to flash the Verified Boot partitions using some special flags, which actually disable the verification:
fastboot --disable-verity --disable-verification flash vbmeta vbmeta_a.img
fastboot --disable-verity --disable-verification flash vbmeta_system vbmeta_system_a.img
fastboot --disable-verity --disable-verification flash vbmeta_vendor vbmeta_vendor_a.img
Now it is possibile to reboot the phone:
fastboot reboot
WARNING: if you don't flash the vbmeta_* partitions disabling them, you will get a boot loop!. In that case you have to keep pressed VolumeUp + Power for several seconds (with the USB cable detached) to enter the Select Boot Mode menu, choose Fastboot and restore the original boot_a.img:
fastboot flash boot_a boot_a.img
Various Apps Problems
K-9 Mail and OpenKeyChain: Cannot connect to the crypto provider
I encountered the problem described into K-9 Mail issue #3420. Once enabled the OpenKeyChain crypto provider into K-9 Mail, the error popup Cannot connect to the crypto provider is displayed whenever I try to send a mail.
Disabling DuraSpeed setting for OpenKeyChain does solve the problem.
Termux-Widget stops to work
I opened the issue #56 against Termux-widget, because the widget suddenly stops to work after a certain time. I turned out that I have to disable DuraSpeed at all, to have the widget working well.
Android 11 Settings
- Don't auto-update apps
- Play Store ⇒ Settings ⇒ Auto-update apps ⇒ Don't auto-update apps
- Install unknown apps
- Settings ⇒ Apps & notifications ⇒ Special app access ⇒ Install unknown apps
- Play Store ⇒ Impostazioni ⇒ Generali ⇒ Notifiche
- Account: Sì
- Aggiornamenti disponibili: No
- Aggiornamenti completati: Sì
- Altro: No


